Cummins ISX12 ISX15 Front Crank Seal Procedure: M20185 Professional Guide
By Blog Admin •
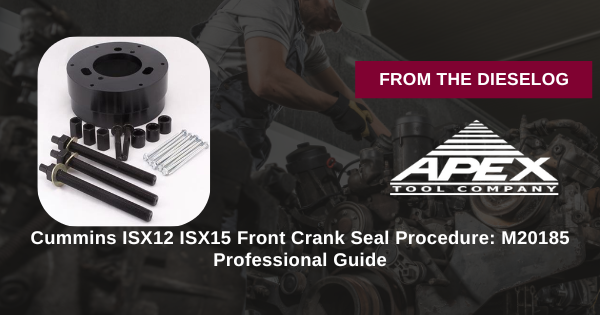
This 12-phase procedure uses the M20185 tool to remove and install front crankshaft seals on Cummins ISX12 and ISX15 engines. Ensures precise alignment and proper depth for leak-free performance.

Introduction: Essential Front Crank Seal Servicing for Cummins ISX Engines
Proper front crank seal service in ISX12/ISX15 prevents oil leaks. The M20185 tool, 4918991 replacement, provides controlled removal/installation—key for durable repairs.
Phase 1-3: Engine Preparation & Removal
- Drain oil and remove harmonic balancer – Catch fluids
- Clean crank snout – Remove old seal/debris
- Inspect seal area – Note wear/score
- Attach remover portion – Secure to seal
- Extract seal carefully – No crank scratches
Phase 4-6: Seal Positioning & Installation
- Prepare new seal – Lube lip evenly
- Position on installer – Align concentric
- Press seal into housing – Even pressure
- Seat to correct depth – Per spec
- Remove tool – Verify flush seating
- Inspect alignment – No gaps
Phase 7-9: Reassembly
CRITICAL: M20185 Installation Setup
- Reinstall balancer – Torque spec
- Refill oil – Check level
- Prime system – No air
- Start idle test – Monitor leaks
- Document seal – Depth/torque
- Reassemble front cover – New gasket
Phase 10-12: Testing & Finalization
- Road test load – Verify no drip
- Final inspection – Clean/no leaks
- Schedule follow-up – At 1,000 miles
Critical Safety Warnings: Seal Procedure
MUST AVOID THESE FATAL ERRORS:
- ❌ Never force removal – Scratches crank ($1.5K+)
- ❌ Never unclean snout – Contam ($2K+)
- ❌ Never uneven press – Misaligns seal
- ❌ Never dry lip – Tears seal
- ❌ Never omit lube – Wear
- ❌ Never skip depth check – Leaks
- ❌ Never ignore spec – Failures
- ❌ Never ignore PPE – Tool risks
Professional Service Documentation
Why M20185 Outperforms Improvised Methods
Risky Improvised Methods:
- ❌ Screwdriver removal → Crank scratches ($1.5K+)
- ❌ Manual press → Uneven seat
- ❌ 1–2 hour struggles → Labor losses
- ❌ Misalignment → Leaks
- ❌ No tool → Failures
M20185 Advantages:
- ✅ Dual remover/installer
- ✅ 4918991 match
- ✅ 70% less rework
- ✅ Crank protection
- ✅ Protects $5,000–$10,500
- ✅ Heavy-duty
- ✅ Precision depth
- ✅ Shop ready
Service Professionally. Seal Cummins Cranks. Maximize Reliability.
Get M20185 – $372.65