Blog
Tech Guide: John Deere Powertech Injector Removal & Installation Procedure (3029–6619)
The complete shop procedure for clean injector service on Deere 3029–6619 Powertech engines.
.png,600)
A step-by-step shop procedure for clean injector service on Deere Powertech engines — using the ATCJDE92 socket the right way, with torque specs, common mistakes, and pro-grade troubleshooting.
Why Proper Injector Removal is Non-Negotiable
John Deere Powertech injectors are precision-fit, high-pressure components. They sit deep in the cylinder head, sealed by copper sealing washers, retained by hardware that has often been heat-cycled for thousands of operating hours. Improper removal — whether from the wrong socket, the wrong sequence, or rushed torque application — leads to one of four outcomes: a rounded retaining nut, a damaged injector body, a destroyed copper seat, or a cracked injector cup. Each of those outcomes turns a routine service job into a major repair, and on customer-owned equipment, into a warranty conversation nobody wants to have.
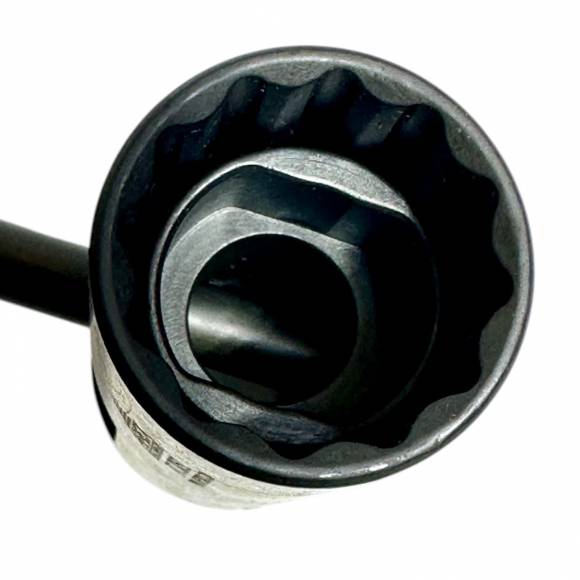
The ATCJDE92 exists because the geometry of Deere injector hardware doesn't match generic 12-point or 6-point deep sockets. The clearance around the injector — between fuel return lines, valve cover hardware, and the head's coolant passages — is tight enough that wall thickness matters. The depth of the recess matters. The point engagement matters. Get any one of those wrong and the job goes sideways before the impact gun even spins up.
The Powertech Injector Service Checklist
- Step 1 — Pre-Service Cylinder Prep and Clean Workspace.
Before any injector hardware comes out, the engine bay needs to be clean. Pressure-wash or air-blow the area around the valve cover, fuel rail, and injector hold-downs to prevent debris from falling into the cylinder once the injector is pulled. Remove the valve cover, isolate the high-pressure fuel lines using line wrenches (never standard open-end wrenches — they round high-pressure fittings instantly), and cap every open fitting immediately. Tools needed: pressure washer or shop air, valve cover gasket, line wrenches in metric sizes, fitting caps, lint-free shop rags. Common mistake: leaving debris around the injector well that falls into the bore during extraction. Even a single grain of sand inside a precision-machined injector seat will cause a slow leak after reassembly. - Step 2 — Disconnect Electrical and Fuel Connections in Sequence.
On electronic-injector Powertech engines, disconnect the injector wiring harness at each injector connector before any mechanical work begins. Document connector orientation with a phone photo — the harness routing matters on reinstallation. Disconnect the high-pressure fuel supply line and the fuel return rail, capping each port. Tools needed: line wrenches, electrical pick set, fitting caps, phone for reference photos. Common mistake: pulling injector hardware with fuel lines still pressurized. Always relieve fuel pressure per the Powertech service manual before disconnecting any fuel fitting. - Step 3 — Engage the ATCJDE92 Squarely on the Retaining Hardware.
Insert the ATCJDE92 fully into the injector well and seat it squarely on the retaining nut or injector body. Verify full engagement by feel — the socket should seat without rocking, without binding against the well walls, and without lateral play. If the socket doesn't seat fully, stop. Reposition. Recheck. Forcing the impact gun on a partially seated socket is the single most common cause of rounded injector hardware on Deere platforms. Tools needed: ATCJDE92 socket, impact-rated extension if required, shop light. Torque approach: break loose with a measured impact pulse, not a sustained gun blast — short, sharp pulses transfer breakaway torque more cleanly than a held trigger. - Step 4 — Extract the Injector with Even Vertical Pull.
Once the retaining hardware is loose, the injector itself often needs encouragement to release from the cup. Use a Deere-specific injector puller — never a slide hammer striking the injector body, and never pry against the head surface. The injector should come out with steady vertical pull, bringing the copper sealing washer with it. If the washer stays in the bore, retrieve it with a magnet or seal pick before any new injector goes in. Tools needed: injector puller, magnet, copper washer pick, replacement copper washers (always replace, never reuse). Common mistake: reusing the old copper washer. Copper work-hardens after one heat cycle and will not seal properly the second time. New washer, every time. - Step 5 — Inspect the Cup, Reinstall, and Torque to Spec.
With the injector out, inspect the cylinder head injector cup for carbon buildup, scoring, or cracking. Clean the cup with a Deere-specific cup cleaning tool — never with abrasives that will damage the seat. Install a new copper sealing washer on the injector, lubricate the injector body lightly per service manual specifications, and reinsert. Use the ATCJDE92 to seat the retaining hardware, applying torque in two stages: an initial seating torque, followed by the final spec value from the Powertech service manual for the specific engine family (3029, 4045, 6068, 6101, 6466 — torque values vary by family, so consult the manual). Tools needed: ATCJDE92, calibrated torque wrench, new copper washers, injector lubricant, service manual. Common mistake: skipping the two-stage torque sequence. Direct application of full torque on an unseated washer crushes it unevenly and creates leak paths.
Troubleshooting Common Issues
Symptom 1: Injector Won't Break Loose
If the injector retaining hardware refuses to release under impact, do not escalate to a longer breaker bar or a heavier gun. Instead, apply a quality penetrating oil around the base of the injector, let it soak for 30 minutes, then retry. If still seized, gentle heat from an inductive heater (never an open flame near fuel components) will break carbon and varnish bonds. Forcing seized hardware is the fastest path to a destroyed injector.
Symptom 2: Socket Slips or Rocks During Engagement
If the ATCJDE92 doesn't seat squarely, the well likely contains carbon debris or the retaining nut has been previously rounded by a wrong-fitting tool. Clean the well thoroughly with a brass brush and shop air, inspect the nut hex, and only proceed once full square engagement is achieved. A rocking socket means an incomplete grip, and an incomplete grip means a rounded nut on the next pull.
Symptom 3: Fuel Leak After Reinstallation
Post-service fuel leaks at the injector almost always trace to one of three causes: a reused copper washer, an incorrectly torqued retainer, or debris on the injector seat. The fix is to pull the injector again, replace the washer, clean the seat with a proper cup cleaner, and re-torque to the manual spec in two stages.
Symptom 4: Misfire or Rough Idle After Service
A misfire after injector reinstallation typically indicates either a damaged injector tip from improper handling or an electrical connector that wasn't fully seated. Verify each electrical connection, then run a cylinder balance test through the Deere diagnostic interface to identify the specific cylinder.
Symptom 5: Combustion Gas Blow-By Around the Injector
Hissing, sooting, or carbon staining around the injector base after restart indicates a failed copper washer seal or a cup that wasn't properly cleaned. This requires immediate teardown — running the engine with a leaking injector seal will erode the cup and the head bore.
Tool Compatibility & Engine Variations
The ATCJDE92 covers the heart of the John Deere Powertech diesel lineup. The 3029 series powers compact tractors and small industrial units. The 4039 and 4045 power skid steers, mid-frame tractors, and a wide range of OEM-rebadged industrial applications. The 6059, 6068, 6076, and 6081 inline-six families dominate ag tractors, combines, and self-propelled sprayers. The 6101, 6466, and 6619 cover larger industrial, marine, and high-horsepower agricultural platforms. Across this entire family, the injector retaining hardware geometry is consistent — which is exactly why a single, purpose-built socket like the ATCJDE92 makes sense as a permanent shop addition rather than ten different platform-specific sockets.
For technicians servicing OEM-rebranded Powertech engines (which appear in everything from Hitachi excavators to JLG aerial lifts), the same socket geometry applies. The injector hardware doesn't change just because the equipment manufacturer changed.
Safety & Shop Best Practices
Diesel injector service involves high-pressure fuel systems capable of injecting hydraulic fluid through skin at lethal velocities. Always relieve fuel system pressure per the Deere service manual before disconnecting any fitting. Never test-fire an injector outside the engine without proper bench equipment. Always wear eye protection — dislodged carbon debris from injector wells will travel.
Cleanliness is not optional on injector work. A single contaminant introduced during reassembly can destroy a $1,800 electronic injector within hours of restart. Use lint-free rags only — paper shop towels shed fibers that lodge in injector tips. Cap every open fuel fitting the moment it's disconnected. Replace every copper sealing washer on every reinstall, no exceptions.
🔧 PRO-TIP: The Two-Pulse Breakaway Method
When breaking loose seized Deere injector hardware with the ATCJDE92, don't hold the impact trigger down. Use two short, sharp pulses with a 2-second pause between them. The first pulse cracks the carbon bond. The second pulse, with the bond broken, walks the nut loose without the cumulative heat buildup that distorts hardware. Sustained trigger pulls actually transfer less effective torque than disciplined pulse work — and they're the leading cause of rounded nuts on stuck injectors.
Frequently Asked Questions — Technician Edition
Q: What's the recommended torque sequence for reinstalling Powertech injectors with the ATCJDE92?
Always reference the specific Deere Powertech service manual for your engine family — torque values differ between the 3029, 4045, 6068, 6101, and 6466. The general approach is two-stage: a seating torque first, then the final spec value. The ATCJDE92's precision fit ensures your torque wrench reads true load.
Q: Can I use the ATCJDE92 with an electric impact gun, or only pneumatic?
The socket is built impact-ready. Both pneumatic and high-torque cordless electric impacts are appropriate for breakaway work. For final torque on installation, switch to a calibrated torque wrench — never set final torque with an impact.
Q: How often should I inspect the ATCJDE92 itself for wear?
Inspect the engagement faces of the socket every time you put it back in the toolbox. Look for chipping, rounding, or distortion. A worn socket will damage hardware just as fast as the wrong socket — and at $90, replacement is cheaper than the first damaged injector.
Q: What lubricant should I use on injector bodies before reinstall?
Use only the lubricant specified in the Deere Powertech service manual for your engine family. Generic anti-seize on injector seats will contaminate the seal and cause leaks. When in doubt, run the seat dry with a fresh copper washer.
Q: Does the ATCJDE92 work on common-rail and EUI Powertech variants?
The socket is designed around the retaining hardware geometry common across the listed Powertech families, which spans both mechanical and electronic injection variants. Always verify hardware compatibility against the Deere parts manual before service.
Q: I'm seeing damage on my old socket. Will replacing it really make a difference?
Yes. A worn socket transfers torque unevenly and rounds hardware progressively. Every job done with a worn socket costs you reusability of the injector. Replace the tool. The math always favors a fresh ATCJDE92.
Q: Do I need any special holding fixture during installation?
For most Powertech injector reinstallations, the cylinder head itself provides the necessary clamping reference. The ATCJDE92 plus a calibrated torque wrench plus a new copper washer is the complete tool set for the job.
Q: Can the ATCJDE92 be used on non-Deere engines?
The tool is engineered specifically for the Deere Powertech injector hardware. Other manufacturers use different geometries. Don't force-fit on non-listed applications — that's how sockets and hardware both get destroyed.
Service Powertech Injectors the Right Way.
The ATCJDE92 — built for 3029 through 6619. $90.00. In Stock.
ORDER THE ATCJDE92 →📞 812-579-5478 / 800-365-2233 · Mon–Fri 8 a.m.–5 p.m. ET · Free shipping over $500
overall rating:
my rating:
log in to rate