Tech Guide: Iveco / New Holland / Case F4A Front Crankshaft Seal Installation Using the 99346252 / 380000666

A complete shop-floor procedure for replacing the front crankshaft seal on F4A platform engines — torque specs, common failure points, and the exact role of the 99346252 Front Crankshaft Seal Installer.
Why Proper Front Seal Installation Is Non-Negotiable
The front crankshaft seal on an F4A engine isn't a wear item that can tolerate sloppy install methods. It's a precision dynamic seal operating against a high-speed rotating shaft, immersed in pressurized oil, and isolating the entire front of the engine from atmospheric contamination. A seal that goes in cocked, deformed, or at the wrong depth doesn't show its failure on the bench — it shows up at customer-pickup-plus-three-days, with oil running down the front of the timing cover and a phone call you don't want to take.
The 99346252 / 380000666 exists for exactly one reason: to remove every variable from this installation except the seal itself. When the tool is used correctly, the only way the seal can fail is if the seal itself was defective from the box.
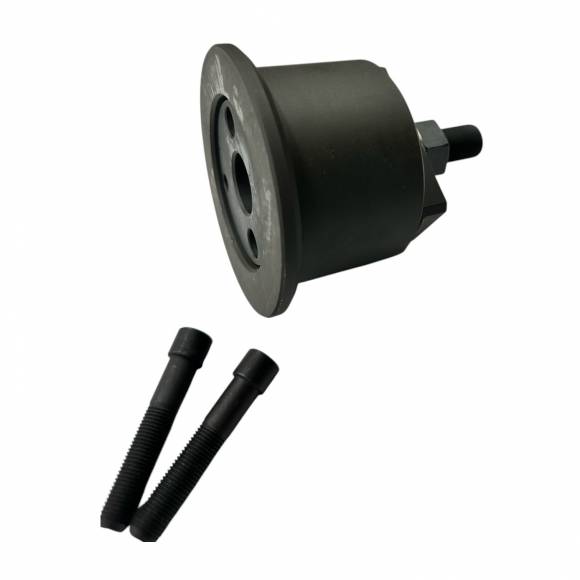
The 99346252 Front Seal Installation Checklist
-
Prep the Timing Cover Bore.
Remove the old seal using a proper seal puller — never a screwdriver pried against the timing cover face. Once the seal is out, inspect the bore for scoring, corrosion ridges, or the shadow of the previous seal carrier. Clean the bore with a lint-free shop towel and brake-clean. Any debris, oil film, or residual sealant inside the bore will compromise the static seal between the new seal's outer carrier and the housing. Run a fingernail around the bore — if you feel a step or a sharp edge, dress it with a Scotch-Brite pad. Tools needed: seal puller, lint-free towels, brake cleaner, Scotch-Brite (red, fine).
-
Inspect the Crankshaft Sealing Surface.
This is the step most installs skip — and it's the one that creates 50% of leak comebacks. Examine the crankshaft snout where the previous seal lip rode. If you see a polished groove, you have two options: install a wear sleeve (preferred), or position the new seal slightly deeper or shallower than OEM spec to ride on un-grooved metal. The 99346252 supports both approaches, but the depth stop assumes a fresh, ungrooved surface as standard. Common mistake: installing a new seal on a grooved snout and watching it leak in 80 operating hours.
-
Pre-Lube the Seal Lip and Crankshaft Snout.
Apply a thin film of clean engine oil to the crankshaft sealing surface and the inside lip of the new seal. Do not over-apply — excess oil on the outer carrier prevents proper sealing against the bore. The lip needs lubrication for the first revolution at startup; the carrier needs to be dry. Some technicians prefer a light film of assembly lube on the lip for extended pre-fire dwell time. Common mistake: dry-installing the lip and shredding it on the keyway during the first crank rotation.
-
Pilot the 99346252 Onto the Crankshaft Snout.
Slide the 99346252 / 380000666 over the crankshaft snout. The tool's pilot diameter centers it precisely on the crankshaft and protects the seal lip from the keyway and any sharp shoulder geometry as the seal travels into position. The seal should sit squarely against the tool's pressing face, with the lip oriented toward the engine (oil side) and the carrier facing outward. If the seal won't sit flat against the tool, recheck orientation — installing a front seal backwards is a same-day comeback.
-
Drive the Seal to Depth.
Apply controlled, even force — either with a dead-blow hammer or via a hand press. The 99346252 distributes that force evenly around the seal's outer carrier, never on the rubber. Continue driving until the tool's depth-stop face contacts the timing cover housing. At that point, the seal is at OEM depth — no measurement required. Resist the temptation to "give it one more tap for good measure." Once the stop is bottomed, additional force does nothing but stress the housing. Common mistake: continuing to drive after the stop bottoms, distorting the housing or damaging the cover gasket sealing surface.
🛠️ PRO-TIP: The 5-Second Final Check
After the seal is seated, run a clean fingertip around the entire perimeter of the seal where it meets the housing face. You should feel zero step, zero cocked edge, and zero gap. If anything feels uneven, the seal isn't seated correctly — pull it and start over. Five seconds at the bench saves five hours next week.
Troubleshooting Common Issues
Symptom 1: Oil leak from front of engine within 50 hours of install
Most common cause: lip roll during installation due to no pilot tool. Less common: defective seal from the box. Diagnostic: pull the seal and inspect the lip with magnification — a rolled lip will show as a folded or crimped edge. Fix: replace seal using the 99346252 with proper pilot and depth control.
Symptom 2: Seal seated unevenly / one side proud of housing
Cause: forced installation with a generic driver that contacted only part of the seal carrier. The seal is now permanently cocked and will leak. Fix: pull and replace using the 99346252 — its full-perimeter pressing face cannot install a seal cocked unless the bore itself is damaged.
Symptom 3: Slow oil weep after 200+ hours
Cause: usually crankshaft snout wear groove that wasn't inspected before install. The new seal is riding in the same worn track as the old one. Fix: install a wear sleeve, or position the seal at an alternate depth to bypass the wear groove. The 99346252 can support depth offset installations with a precision shim under the depth stop.
Symptom 4: Garter spring visible / displaced after install
Cause: the seal lip folded during install and dislodged the internal garter spring. Without the spring's radial load, the lip can't maintain contact with the crankshaft. Fix: discard seal (it's destroyed), replace with new, install with the 99346252.
Symptom 5: Sealant residue contamination on the new seal carrier
Cause: timing cover bore wasn't cleaned of old anaerobic sealant or RTV. The new carrier is sealing against contamination, not metal. Fix: pull the seal, fully clean the bore with brake cleaner and a fine Scotch-Brite, and reinstall with a fresh seal using the 99346252.
Tool Compatibility & F4A Platform Variations
The 99346252 / 380000666 is engineered for the F4A engine platform across its three primary applications: Iveco light commercial and vocational chassis (Daily, Eurocargo derivatives), New Holland agricultural equipment (tractors, balers, harvesters using the F4A engine family), and Case construction equipment (skid steers, compact track loaders, and select wheel loader applications). The shared front crankshaft seal geometry across these platforms is what allows a single dedicated tool to cover the entire engine family. Always verify your specific model year and engine variant against the F4A platform — the Iveco/New Holland/Case parts catalogs cross-reference cleanly to this tool.
Adjacent F-series engines (F4B, F4C, etc.) often use different front seal geometry and require platform-specific installers. Don't substitute — the front seal bore dimensions vary even within the F-series family.
Safety & Shop Best Practices
Front seal installation is low-risk mechanically but high-risk for repeat-repair exposure. The shop best practices that protect technicians and customers alike include: always wear nitrile gloves to avoid contaminating the seal lip with skin oils that degrade rubber compounds; never reuse a seal — even if it appears undamaged, the lip's set-shape is permanent; always inspect the crankshaft snout under good light before assuming the bore is the only relevant surface; document the part number and install date in the work order so future technicians know the seal's service history; and always pair a front seal install with a torque check of the harmonic balancer to OEM spec — a loose balancer destroys a fresh seal in hours.
From a safety standpoint, ensure the engine is supported and the crankshaft cannot rotate during install. A turning crank during seal seating is how technicians lose fingertips.
Frequently Asked Technician Questions
Q: Can the 99346252 install both metal-cased and rubber-OD seals?
Yes. The pressing face contacts the seal's outer rim, which works for both metal-cased and full-rubber outer-diameter seal designs used across F4A variants.
Q: Do I need to remove the harmonic balancer to use this tool?
Yes — the harmonic balancer must be off to access the front seal. The 99346252 pilots on the exposed crankshaft snout.
Q: What's the proper torque spec for the F4A harmonic balancer bolt on reassembly?
Always reference the current Iveco/New Holland/Case service manual for your specific application. The torque spec varies by model year and balancer design — under-torque destroys the new seal as the balancer walks.
Q: Can I use this tool dry, or do I need to lubricate the tool itself?
The tool runs dry. Lubricant goes on the seal lip and crankshaft, never on the installer pressing face.
Q: How do I store the 99346252 between uses?
Keep it clean, dry, and protected from impact damage. The pilot diameter and depth-stop face are precision surfaces — store it in the original packaging or a dedicated tool slot, not loose in a drawer.
Q: What's the service life of this tool?
With proper care, the 99346252 will outlast the technician using it. Hardened steel construction, no moving parts to wear, no consumables.
Q: Is there a removal tool to match?
For F4A front seal removal, a standard slide-hammer seal puller works — the install is the precision step, not the removal.
Q: Does Apex Industries offer support if I have install questions?
Yes. Call 812-579-5478 or 800-365-2233, Mon–Fri 8 a.m. – 5 p.m. ET. Apex's technical staff knows the F4A platform.
Install F4A Front Seals Right the First Time
The 99346252 / 380000666 is the dedicated installer for Iveco, New Holland, and Case F4A front crankshaft seals. $325.00 — In Stock — Ships Same-Day.
ADD TO SHOP TOOLBOX — $325.00📞 812-579-5478 / 800-365-2233 | Mon–Fri 8 a.m. – 5 p.m. ET