Blog
DD15 & DD16 Piston Installation Procedure with the ATC W470589015900
A working technician's complete DD15/DD16 piston installation walkthrough

A complete, step-by-step DD15/DD16 piston installation walkthrough using the J47386-equivalent ring compressor — written for working diesel technicians.
Why Proper Piston Installation is Non-Negotiable on DD15/DD16
The Detroit Diesel DD15 and DD16 represent some of the most thermally and mechanically loaded pistons ever fitted to a heavy-duty on-highway engine. Peak cylinder pressures north of 200 bar, articulated steel piston crowns, ultra-tight ring lands, and emissions-tuned ring coatings combine to make installation precision the single biggest variable in long-term engine durability. There is no margin for hammered-in pistons, side-loaded ring packs, or eyeballed ring compression. The factory procedure exists for a reason — every step in the DDC service manual is the result of warranty data, failure analysis, and engineering teardown reports. The ATC W470589015900 / J47386 isn't optional equipment; it is the tool the procedure was written around. Skipping it or substituting a generic alternative is the same as torquing main bearings without a torque wrench. It might work. It probably won't.
The DD15/DD16 Piston Installation Checklist
- Pre-Stage the Short Block and Verify Cleanliness. Before any piston touches a liner, the cylinder bores must be honed to factory crosshatch spec, washed in hot soapy water (not solvent — solvent leaves residue in honing grooves), dried with compressed air, and wiped with white lint-free rags until they come back clean. Liners must be torque-plate honed if you're working out-of-frame. Any micro-debris in the bore at this stage will become embedded abrasive in the new ring face within the first 30 seconds of operation. Tools needed: torque plate (if applicable), hone, hot wash setup, white shop rags, mineral spirits for final wipe, blow gun. Common mistake: wiping bores with the same rag used on the deck surface — cross-contamination is invisible but fatal.
- Stage the Pistons, Rings, and Connecting Rods. Confirm each piston is matched to its assigned cylinder and rod (DD15/DD16 pistons are weight-matched and graded — never mix them between holes). Install rings in the correct order from bottom up: oil ring expander first, then the two oil ring rails (gaps 180° apart from the expander gap), then the second compression ring (note the directional mark — usually a dot or "TOP" stamp facing up), then the top compression ring. Stagger all ring gaps 120° apart, never aligned with each other or with the wrist pin axis. Tools needed: ring expander pliers, magnetic parts tray, factory service manual diagram. Common mistake: installing the second compression ring upside down — the taper face must point up.
- Lubricate Per Factory Spec — Not With Whatever's on the Bench. The DDC procedure calls for clean engine oil on the rings and a moly-based assembly lube on the wrist pin and skirt thrust faces. Do not use heavy assembly lube on the ring face — it can cause hydraulic lock between the ring and the bore that fights the compressor. Apply oil to the ring pack, the piston skirt, and the upper liner bore with a clean acid brush. Coat the rod bearing with a thin film of oil only — assembly lube on bearings can wash unevenly during initial fire and cause spotty break-in. Tools needed: clean engine oil (matching the spec the engine will run on), assembly lube, acid brush, clean rags. Common mistake: dunking the whole piston in oil — excess oil in the ring lands prevents proper ring seating.
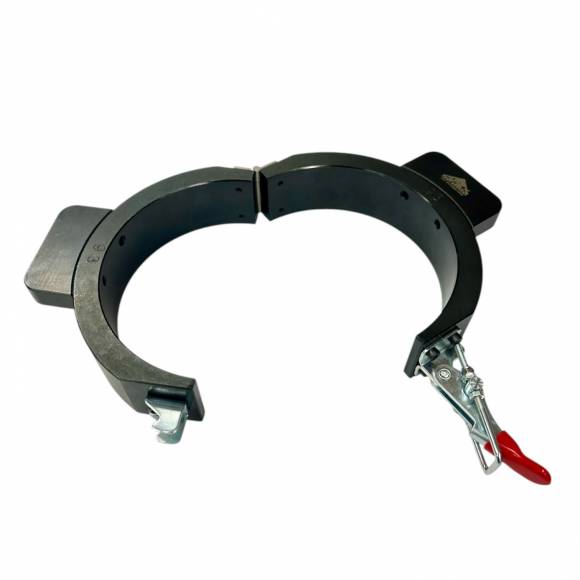
- Position the W470589015900 Compressor and Compress the Ring Pack. Place the ring compressor on a clean, flat surface. Insert the lubricated piston into the compressor from the top with the connecting rod hanging down through the bore. Push the piston into the compressor until the ring pack is fully captured and the lower edge of the oil ring is flush with the compressor ID. The piston skirt should protrude from the bottom of the compressor by approximately 1 to 1.5 inches — this is your guide nose into the liner. Verify all rings are uniformly compressed by visual inspection through the compressor — no ring should be visible above the compressor ID. Tools needed: ATC W470589015900 / J47386 compressor, clean work surface. Common mistake: forcing the piston in dry — always lubricate the ring pack and compressor ID lightly with engine oil to ease entry.
- Insert the Piston into the Liner Without Hammering. Rotate the crankshaft so the rod journal for the cylinder being installed is at BDC. Guide the connecting rod down into the bore, careful that the rod bolts do not contact the crank journal — slip protective rod bolt covers over the threads. Lower the compressor onto the deck surface, square it against the bore, and use the wooden handle of a hammer (or a dedicated soft-face piston driver) to firmly push the piston down with steady hand pressure. The piston should slide cleanly out of the compressor and into the liner with controlled force — never with a hammer strike. If the piston resists, STOP. Lift it back into the compressor, recheck ring orientation and lubrication. Tools needed: rod bolt protectors, wooden hammer handle or soft-face driver, the W470589015900 compressor, mechanic's flashlight. Torque spec for follow-up rod cap installation on DD15: 60 N·m + 90° + 90° (verify against current DDC service bulletin). Common mistake: hammering when resistance is felt — that is the sound of a chipped ring being installed.
🔧 PRO-TIP: The "Tap Test" Before Installation
Before lowering the piston into the liner, tap the side of the W470589015900 compressor lightly with a plastic mallet while the piston is staged. If you hear a sharp click or feel any spring-back from a ring, one of the rings is not fully compressed — pull the piston, reseat the rings, and re-stage. This 10-second check has saved more rebuilds than any other technique on the floor.
Troubleshooting Common Issues
Symptom 1: Piston Won't Slide Out of the Compressor. If you feel resistance pushing the piston down, do not force it. Likely causes: insufficient lubrication on the compressor ID, ring not fully captured, debris between ring and compressor wall, or compressor not square to the deck. Lift the piston back into the compressor, inspect each ring, re-lubricate, square the compressor, and try again. Forcing creates the exact damage the tool is designed to prevent.
Symptom 2: Ring Visible Above Compressor After Loading. A ring sitting proud of the compressor face means it isn't compressed. Common cause is an oil ring expander that bunched during installation. Pull the piston back out, remove and re-install the oil ring assembly, ensuring the expander ends are butted (not overlapped) and the rails are correctly seated.
Symptom 3: Compressor Tilts During Insertion. If the compressor lifts on one side as you push the piston down, your deck surface may be debris-fouled, or the compressor base isn't seated flat on the deck. Stop, lift the assembly, wipe the deck and the compressor base, and re-seat. Tilted entry will scrape the liner chamfer and risk a ring catch.
Symptom 4: Rod Bolts Contacting Crank Journal During Drop. Critical issue — bolt-to-journal contact will nick the crank, requiring a polish or worse. Always use proper rod bolt protectors. If you've nicked a journal, stop the rebuild and assess whether polish-out is possible. A nicked journal will eat a bearing in 50,000 miles.
Symptom 5: Piston Drops Below Deck Without Resistance. If the piston enters the liner with zero feel — too easy — verify ring tension. A piston that drops freely usually means a missing ring, an improperly tensioned oil expander, or a ring installed inside-out. Pull and inspect immediately.
Tool Compatibility & Engine Variations
The ATC W470589015900 / J47386 is engineered specifically for the Detroit Diesel DD15 and DD16 platforms. It will not interchange with the DD13 — that engine uses a smaller bore and a different ring compressor (J47385). It is also not compatible with legacy Detroit Diesel Series 60 engines, which use entirely different piston geometry and require their own compressor tooling. The DD15 in this context covers all model years from initial 2007 launch through current production, including DD15 EPA10, DD15 GHG14, and DD15 GHG17 variants — Detroit retained the same bore and piston OD across these emissions tiers, so a single compressor covers the entire production run. The DD16 shares the bore dimension with the DD15 and uses the same compressor. Mercedes-Benz/Daimler OM471 and OM473 engines, while related to the DD15/DD16 in lineage, have platform-specific tooling and should not be serviced with this compressor unless cross-referenced against the current Daimler service tool list.
Safety & Shop Best Practices
Eye protection is non-negotiable when handling piston rings — they are spring-tensioned and edges are sharp enough to slice gloves and skin. Wear cut-resistant gloves during ring installation but switch to nitrile for the lubrication and final compressor staging step to retain feel. Keep the work area free of metal shavings, gasket scrap, and rag fibers — anything that ends up in a ring land will damage the cylinder. Never set a staged piston (loaded into the compressor) down on a bare bench top — fragments of debris can lodge between the rings and the compressor wall. Use a clean shop towel under the compressor between staging and installation. Document torque values on the rod cap installation in writing — DDC requires angle-torque verification, and a missed angle pass can fatigue a rod bolt and drop a rod through the block at 70,000 miles.
Technician FAQ
Q: Can I reuse the W470589015900 across multiple in-frames in one day?
Yes. Wipe the compressor ID clean between installations, light oil mist, and continue. The tool is built for production-shop duty cycles.
Q: What's the ideal storage method between jobs?
Wipe clean, light coat of preservative oil (LPS-3 or equivalent), wrap in oil paper or store in a dry tool drawer. Avoid leaving the compressor in a damp engine bay overnight — surface rust on the ID will scratch ring coatings.
Q: Should I check the compressor ID for wear after extended use?
Yes — annually for a high-volume shop. Measure the ID against factory spec (refer to DDC service literature for current dimension). A worn-out compressor ID will not provide consistent ring compression.
Q: What if I damage the compressor mid-job?
Stop, do not attempt to install with a damaged tool. Apex Industries stocks the W470589015900 in inventory — call 812-579-5478 for same-day shipping availability.
Q: Is there a video walkthrough of this procedure?
Yes — Apex Industries publishes technical video content for major Detroit Diesel service procedures. Subscribe to the Apex YouTube channel for the latest DD15/DD16 rebuild guides.
Q: What torque is the rod cap on a DD15?
Always verify against the current DDC service bulletin for the exact engine SN and emissions tier. General reference: 60 N·m initial + 90° angle + 90° angle, but bulletins have updated torque sequences over the years. Use the current published spec.
Q: Can a less-experienced tech use this tool safely?
The tool itself is straightforward, but a DD15/DD16 in-frame is not an entry-level job. Pair newer techs with experienced lead techs for first builds. The compressor doesn't fix bad ring orientation or contaminated bores.
Q: What's the lead time on this tool?
The W470589015900 is in stock at Apex Industries. Standard ground shipping with free freight on orders over $500 in the continental US.
Build It Right the First Time
ATC W470589015900 / J47386 — DD15 & DD16 Piston Ring Compressor — $330.00
SHOP NOW →📞 812-579-5478 / 800-365-2233 | Mon–Fri 8am–5pm ET
overall rating:
my rating:
log in to rate