
Blog
Tech Guide: Detroit Diesel Series 60 Cam Gear Installation Using the ATC J-35906-A Pilot Tool
Master the art of camshaft gear seating for Detroit Diesel engines.

A complete shop-floor procedure for precise Series 60 cam gear installation — covers both old-style and new-style cam gear bolts, written for the technician with their hands on the wrench.
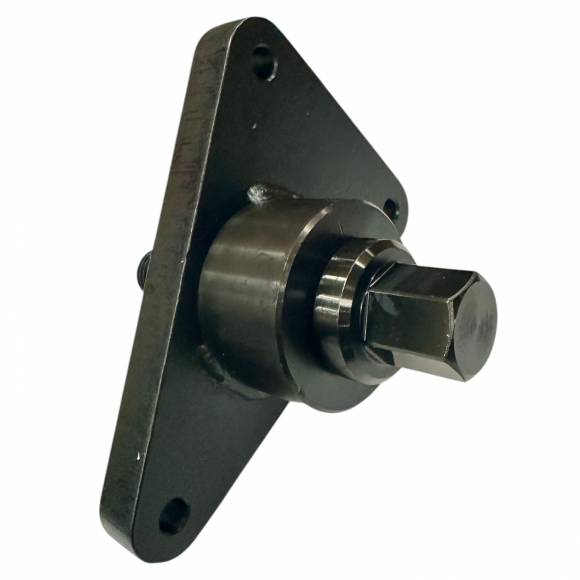
Why the Cam Gear Pilot Is Non-Negotiable on Series 60 Rebuilds
The Series 60 cam gear sits on a precision-machined cam hub, locates off a keyway and dowel, and is retained by a single high-torque bolt. The clamping force pulls the gear hub flat against the cam face — but only if the gear was perfectly square going in. If the gear sits cocked even slightly when you start drawing the bolt down, the clamping force locks it cocked. There is no fixing that condition with more torque or less torque. The only fix is a pilot tool that holds the gear true to the cam axis through the entire bolt-down sequence.
The ATC J-35906-A is that tool. It pilots both old-style and new-style cam gear bolt configurations across the full Series 60 production run, which means one tool covers every Series 60 cam gear job that walks into your bay regardless of model year. This guide walks the procedure end-to-end so a competent diesel tech can run a Series 60 cam gear installation with zero comebacks and zero alignment-related concerns.
The Series 60 Cam Gear Installation Checklist — Step by Step
- Step 1: Inspect the Cam Hub Face and Gear Bore Before Anything Else.
Before you touch the pilot tool, the cam hub face and the gear bore both need to be clean, undamaged, and dimensionally correct. Wipe both surfaces with brake cleaner and a lint-free rag. Inspect the cam hub face under good light for burrs, scuffs, raised metal, or surface corrosion. Any imperfection here transfers directly into the gear-to-cam interface and causes alignment problems even with a pilot tool installed. If you find damage, the cam comes out for repair or replacement — there is no bay-floor shortcut. Tools needed: brake cleaner, lint-free rags, magnifying loupe, inspection mirror, shop light. Common mistake: skipping the inspection because the cam looks clean from across the bay. Get your eyes within 6 inches of the surface. - Step 2: Identify Old-Style vs. New-Style Cam Gear Bolt and Confirm Hardware.
The Series 60 production run includes early-style cam gear bolts and updated-style bolts. Verify which configuration applies to the engine you are working on by referencing the engine serial number against the Detroit Diesel parts manual. Use only the correct bolt — they are not cross-compatible, and substitution causes torque-spec problems. Inspect the bolt for thread condition, head condition, and any signs of prior over-torque (head distortion or thread necking). If there's any doubt, replace the bolt — Series 60 cam gear bolts are inexpensive insurance. Tools needed: Detroit Diesel parts catalog, OE-spec replacement bolt if needed, thread gauge. Common mistake: reusing a bolt that's been torqued multiple times — these are high-stress fasteners and replacement is cheap. - Step 3: Install the J-35906-A Pilot on the Camshaft.
With the cam in service position and timing reference established, install the J-35906-A pilot tool onto the camshaft. The pilot interfaces with the cam to provide a precision concentric reference for the gear bore. Ensure the pilot is fully seated and rotates freely without bind — if it binds, the cam hub or pilot has a contamination or surface issue that needs resolution before proceeding. The pilot is the single point that makes this whole procedure repeatable. Tools needed: ATC J-35906-A Cam Gear Pilot, clean rag, light coat of assembly oil on the pilot interface. Common mistake: installing the pilot dry — a thin film of assembly oil on the pilot-to-cam interface ensures clean engagement and easy removal after install. - Step 4: Position the Cam Gear Over the Pilot and Onto the Camshaft.
Lower the cam gear over the pilot tool. The pilot guides the gear bore into precise concentric alignment with the cam axis. Engage the keyway and any dowel features per OE service procedure, verifying that the gear seats flat against the cam hub face with no rocking or hanging. The pilot does the alignment work — your job is to confirm clean engagement before the bolt goes in. Rotate the gear gently to verify smooth tooth engagement with the idler if the timing chain or idler gear is in position. Tools needed: assembly oil, lint-free rag for hub face wipe-down. Common mistake: forcing the gear if it hangs up — if it doesn't seat freely, something is wrong (debris, burr, mis-clocked keyway). Stop and find the cause. - Step 5: Install and Torque the Cam Gear Retaining Bolt to OE Spec.
With the gear seated on the pilot, install the cam gear retaining bolt with a light coat of clean engine oil on the threads (not anti-seize — anti-seize falsifies torque readings on this fastener). Snug the bolt by hand, then torque per the Detroit Diesel service manual sequence and final value for the specific bolt style (old-style and new-style have different specs). The pilot remains in place through the entire torque sequence to prevent any gear shift during clamping. After final torque, verify that the gear seats flat against the cam hub face with feeler gauge access at multiple points — there should be zero gap detectable. Tools needed: calibrated torque wrench, Detroit Diesel service manual, 0.0015" feeler gauge for verification. Common mistake: pulling the pilot before final torque — that shift during clamping is exactly what the pilot is preventing.
🛠️ PRO TIP: Verify Timing Reference After Install
Before you button up the front cover, bar the engine over to TDC #1 compression and verify that all timing reference marks align per Detroit Diesel service spec. The J-35906-A ensures the gear is mechanically square, but visual timing verification is the final shop-floor confirmation that the install is correct. A 60-second check now prevents a 6-hour re-time job after the cover is back on.
Troubleshooting Common Issues
Issue 1: Pilot tool binds on the cam hub during installation. The pilot should slide on cleanly with light hand pressure. If it binds, the most common causes are debris on the cam hub interface, burrs from previous gear removal, or a damaged hub face. Stop, remove the pilot, clean and inspect the cam interface, dress any burrs with a fine stone, and re-attempt. Never force a binding pilot — you'll mark the precision interface and create the exact alignment problem you're trying to prevent.
Issue 2: Cam gear won't seat flat against the cam hub face. If the gear rocks or shows a visible gap when you check it with a feeler gauge, the issue is between the gear bore and the cam hub face — not between the gear and the pilot. Pull the gear, inspect both surfaces under magnification, dress any high spots, and verify keyway clearance. If the surfaces are correct and the gear still won't seat, the gear itself may be damaged from a previous improper install.
Issue 3: Cam gear bolt torque feels inconsistent or doesn't reach spec. Inconsistent torque readings on Series 60 cam gear bolts almost always trace back to thread contamination (oil, dirt, anti-seize residue from a previous install). Pull the bolt, clean the threads with brake cleaner and a thread chaser, apply only OE-spec lubrication (clean engine oil for these fasteners), and re-torque. If torque is still inconsistent, the bolt may be stretched from a previous over-torque event — replace and retry.
Issue 4: Gear noise on first run after install. If the engine fires and you hear a metallic gear whine that wasn't there before, the cam gear is meshing unevenly with the idler. Most common cause: gear hub damage from prior improper install (burrs on the hub face that were not addressed in this rebuild). Less common but possible: pilot tool was pulled before final torque and the gear shifted during clamping. Pull the front cover and verify gear face contact under good light.
Issue 5: Old-style vs. new-style bolt confusion on a mid-production engine. Some Series 60 engines straddled the bolt-style transition. If the engine serial number is in the gray zone, verify by inspecting the existing cam gear bolt that came out of the engine (assuming it's the original). The bolt head dimensions and thread length tell you which style is in service. When in doubt, contact Detroit Diesel parts support — running the wrong bolt voids the whole purpose of the rebuild.
Tool Compatibility & Engine Variations
The ATC J-35906-A is engineered specifically for the Detroit Diesel Series 60 family, covering all displacement variants (11.1L, 12.7L, 14.0L) and all model years across the production run from 1987 through end of production. The tool's dual-bolt-style compatibility is its signature feature — you do not need separate tooling for early-style versus updated-style cam gear bolts.
It is not compatible with: the newer Detroit Diesel DD13/DD15/DD16 platforms (entirely different cam gear geometry — those engines require the J-47487 cantilever support family of tools); legacy two-stroke 6V/8V/12V engines (different timing architecture); or other heavy-duty diesel platforms (Cummins, Caterpillar, Mack), all of which have their own platform-specific cam alignment tooling.
For shops servicing a mixed Detroit Diesel fleet, the J-35906-A and the DD-platform special tools are complementary — you need both for full-coverage diesel capability across legacy and current Detroit engines.
Safety & Shop Best Practices
PPE: Safety glasses are mandatory during cam gear work — flying fastener pieces from a snapped or stretched cam gear bolt are exactly the injury risk that justifies the basic eyewear. Cut-resistant gloves protect against the burrs and sharp edges typical of any disassembled timing component.
Cleanliness Discipline: Cam gear installation is precision work. Every surface that mates during this procedure needs to be clean. The cost of cleaning is a few rags and a spray can. The cost of skipping cleaning is a comeback. There is no scenario where the math favors shortcuts here.
Tool Inspection: Inspect the J-35906-A pilot before each use for surface damage, contamination, or impact marks. The tool's value depends on its precision. A drop on concrete can deform a critical surface in a way that's not visible to the naked eye but ruins the alignment function. Treat the tool the way you treat a torque wrench — store it correctly, inspect before use, and retire if damaged.
Documentation: Photograph the cam gear in service position with the J-35906-A installed, the bolt installed, and the gear seated. This is partly for warranty defensibility (proves correct procedure was followed) and partly for shop training.
Frequently Asked Questions — Technician Edition
Q1: How long does the J-35906-A add to a typical Series 60 rebuild?
Three to five minutes for the cam gear install portion. The pilot installs in seconds, the gear drops over it, the bolt torques in normally, and the pilot pulls free. The trade is a handful of minutes added on the bench against zero comebacks on the back end. There is no shop where that math doesn't favor the tool.
Q2: Can the same pilot install multiple cam gears in a row without inspection?
For routine pro-shop use, a quick visual inspection between installs is enough — wipe down, look for damage or contamination, proceed. The tool is durable enough to handle a high-volume rebuild operation without dimensional issues, but it is not consumable and not disposable. Treat it like you treat your other precision tools.
Q3: Does the pilot work with assembly oil, or does it need to be installed dry?
A light film of clean assembly oil on the pilot-to-cam interface improves engagement and makes removal cleaner after the gear is torqued. Do not flood the interface with oil — a thin film is sufficient.
Q4: What's the right torque sequence and final value for the Series 60 cam gear bolt?
This varies between old-style and new-style bolt configurations and across model year revisions. Always reference the current Detroit Diesel Series 60 service manual for your specific engine. The J-35906-A holds the gear correctly during whatever sequence and value the manual specifies — but it does not replace the OE torque chart.
Q5: Can I use the J-35906-A to remove a cam gear, or only to install?
The J-35906-A is an installation pilot, not a puller. For cam gear removal you'll need a proper Series 60 cam gear puller. Some shops use both tools as a paired set for full cam gear service capability.
Q6: How does this tool compare to renting from the dealer?
Dealer rentals on cam gear pilots typically run $60–$100 per day depending on region. Two rentals and you've matched the purchase price of the J-35906-A. For any shop doing more than a handful of Series 60 cam jobs annually, ownership is the only sensible economics.
Q7: Does the tool come with calibration documentation?
The J-35906-A is built to OEM dimensional specifications and ships verified. It does not require periodic recalibration under normal pro-shop use. Like any precision tool, treat it carefully and inspect before use.
Q8: What if I have a Series 60 with an unusual cam gear configuration — generator set or marine application?
The J-35906-A covers standard Series 60 cam gear architecture across truck, generator, and marine variants. Specialty applications with non-standard cam gear configurations are rare; if you're not sure your application is covered, contact Apex Tool Company at 812-579-5478 for compatibility verification before ordering.
Equip Your Bay for Series 60 Cam Gear Work.
The ATC J-35906-A is in stock and shipping today. $140.00 — covers old AND new bolt styles in a single tool.
SHOP THE ATC J-35906-A — $140.00📞 812-579-5478 / 800-365-2233 | Mon–Fri 8 a.m.–5 p.m. ET
Free shipping on US orders over $500
overall rating:
my rating:
log in to rate