
Blog
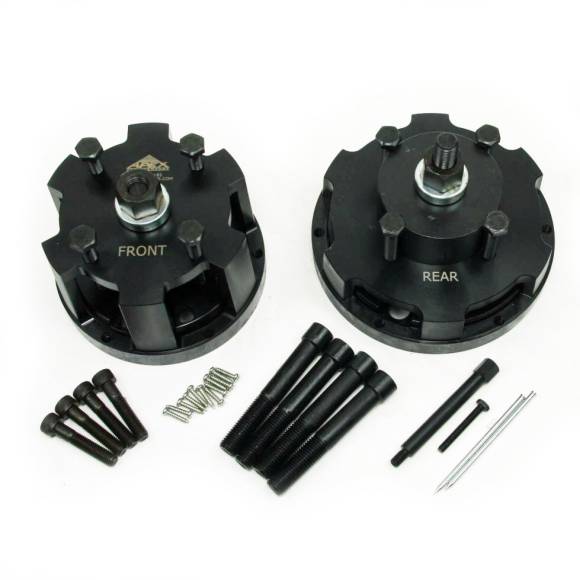
Paccar MX13 Front & Rear Crankshaft Seal Replacement — Step-by-Step with the ATC1453185
The complete shop-floor procedure for front and rear crank seal service on the Paccar MX13

A complete, shop-floor walkthrough of front and rear crankshaft seal service on the Paccar MX13 using the ATC1453185 installer/remover kit. Torque specs, sequence, mistakes to avoid — everything you need to do it right the first time.
Why Crankshaft Seal Service Is Non-Negotiable on the MX13
The Paccar MX13 runs tight bearing clearances, high cylinder pressures, and a robust harmonic damper system that places significant dynamic load on the front crank snout. Combined with the engine's load-sensitive lubrication system, even a slow oil weep at either crankshaft seal creates downstream problems fast: contaminated belts, slipping accessory drive, fouled clutch (rear), and — eventually — bearing-starvation events when oil level drops below the pickup screen.
OEM-correct seal service on this engine isn't optional. The seals are precision parts running on hardened wear sleeves with tight depth tolerances. Get any of it wrong and the engine punishes you for it. This guide walks through the complete procedure for both the front and rear crankshaft seals using the ATC1453185 service kit — the only way to do this job right without buying two separate special tools.
The Crankshaft Seal Service Checklist — 5 Critical Steps
- Step 1 — Prep the Engine and Access the Seal Bore
Disconnect both battery banks and lock out per shop policy. For the front seal, drain coolant if removing the cooling fan and accessory drive belts. Remove the upper and lower fan shrouds, the cooling fan, and the harmonic balancer retaining bolt — these are TTY (torque-to-yield) fasteners on the MX13 and must be replaced, never reused. Use a strap wrench or flywheel-lock to hold the crank, then back the balancer bolt out. Pull the balancer with a proper three-jaw puller. For the rear seal, drop the transmission, remove the clutch assembly, and unbolt the flywheel — the flywheel bolts are also TTY and must be replaced. Inspect the crank snout (front) or rear flange surface (rear) for scoring, corrosion, or pitting before going any further. Tools needed: 21mm and 24mm sockets, breaker bar, balancer puller, clutch alignment tool (rear), magnetic parts tray. - Step 2 — Remove the Old Seal with the ATC1453185 Puller
Mount the appropriate ATC1453185 puller adapter for either front or rear application. The fixture indexes off the seal carrier — never on the crankshaft itself. Thread the puller screw evenly, applying steady torque. The seal will walk out of its bore without scoring the wear sleeve or marking the crank surface. If the seal resists, back off and verify the puller is squared up — never force it. Forcing creates the exact damage this tool exists to prevent. Once the seal is out, inspect the wear sleeve carefully: any visible groove, score, or corrosion means the sleeve must be replaced before the new seal goes in. A bad sleeve guarantees a leaking new seal. - Step 3 — Clean and Prep the Seal Bore
This is where most failures originate. Use lint-free shop towels and brake clean (or aerosol contact cleaner) to remove every trace of old seal compound, gasket maker, or oil film from the seal bore. The bore must be dry and free of debris. Inspect for any nicks or burrs in the bore — knock them down with a fine deburring stone if found. Apply a light film of clean engine oil to the seal lip (never grease — grease attracts dirt and breaks down the elastomer). Apply a thin film of fresh engine oil to the wear sleeve surface where the seal lip will ride. Do not use sealant on the OD of the seal unless Paccar's service bulletin for your specific build year calls for it — most MX13 applications use a dry-fit OD with the seal's built-in coating. - Step 4 — Press the New Seal with the ATC1453185 Installer
Slip the new seal over the crank snout (front) or rear flange (rear), oriented with the lip facing inward toward the engine. Position the ATC1453185 installer adapter against the face of the seal. The adapter's pilot engages the crankshaft and ensures the seal cannot enter the bore at an angle. Thread the installer screw evenly until the depth stop contacts the housing. Stop pressing the instant the depth stop bottoms. Do not "snug it down for good measure" — the depth stop is set to Paccar's published spec. Over-pressing pushes the seal lip past its design wear sleeve contact zone and creates a guaranteed leak. Tools needed: ATC1453185 kit, clean engine oil, lint-free rags, brake clean. - Step 5 — Reassemble, Torque to Spec, and Verify
Reinstall the harmonic balancer with a new TTY bolt (front) or the flywheel with new TTY bolts (rear). Torque the front balancer bolt to Paccar's published spec for your build year — typically a multi-stage sequence ending in a torque-angle pass. Rear flywheel bolts follow a star pattern with similar TTY sequence. Reinstall the clutch (rear) using a proper alignment tool, then mate the transmission. Reinstall accessory drive components, belts, fan, and shrouds. Refill coolant if drained. Start the engine and run at idle for 10 minutes while watching for any seepage at the seal area. Road test under load. If no weep appears in 100 miles of normal duty cycle, the job is complete.
Troubleshooting Common Issues
Symptom 1 — New seal leaks within 200 miles: Almost always one of three causes — seal installed cocked (not square), seal pressed too deep (lip riding off the wear sleeve), or contaminated seal bore. Pull the seal, inspect carefully, and reinstall using the ATC1453185 with proper bore prep. If the wear sleeve shows any wear pattern, replace it.
Symptom 2 — Seal walks out under load: Excessive crankcase pressure. Check the crankcase breather, CCV separator, and PCV system. A plugged breather will push any seal out of its bore. Repair the ventilation system before condemning the seal again.
Symptom 3 — Oil weep at the seam between timing cover and block (front) or rear cover and block (rear): Not a seal issue. That's a gasket or sealant joint failure. Inspect the timing cover or rear cover gasket and reseal per Paccar's service procedure. The crankshaft seal is innocent here.
Symptom 4 — Seal removal damages the wear sleeve: Using anything other than the ATC1453185 (or equivalent OEM tool) is asking for this. Pry bars, slide hammers, and impact pullers contact the wrong surfaces and gouge the sleeve. If the sleeve is damaged, it must be replaced — there's no field repair for a scored chrome sleeve on the MX13.
Symptom 5 — Engine throws low oil pressure code shortly after seal service: Check that no debris (old seal pieces, RTV crumbs, shop rag fibers) entered the engine during service. Drop the pan if necessary and inspect the pickup screen. This is rare but catastrophic if missed.
Torque Specs & Reference Data for the MX13 Crank Seal Job
Always consult your specific Paccar service manual for the exact torque values applicable to your engine build year and revision level — Paccar publishes revision updates and we don't recommend committing fixed numbers to memory. That said, here's the framework every MX13 crank seal job follows:
- Harmonic balancer bolt: Multi-stage TTY sequence — typically initial torque to a specified ft-lb value, followed by a precise rotational angle (often 90° or more). Always use a new TTY bolt and a calibrated angle gauge or digital torque-angle adapter.
- Flywheel bolts: Star-pattern multi-stage TTY sequence. New bolts every time, star sequence followed exactly, final angle pass verified.
- Rear cover plate fasteners (if removed): Standard torque values published in the service manual — typically in the 25–45 Nm range depending on bolt grade and location.
- Front timing cover fasteners (if removed for related work): Sequenced tightening per Paccar's diagram to avoid distortion of the front cover sealing surface.
The ATC1453185 itself is hand-thread operated — there's no torque spec on the tool's press screw. Apply steady, even pressure until the depth stop bottoms, then stop. Forcing the screw past the depth stop accomplishes nothing except risking damage to the tool or the seal.
Tool Compatibility & Engine Variations
The ATC1453185 is engineered specifically for the Paccar MX engine family. Confirmed application coverage:
- Paccar MX (2011–2016 model years)
- Paccar MX-13 (all variants)
- Paccar MX PMCI-2
- Paccar MX-13 PCI
- Cross-reference part number 1453185PE for Kenworth and Peterbilt OEM service documentation
Truck applications include Kenworth T680, T880, W990, and Peterbilt 579, 567, 389 spec'd with the MX13 powerplant. The tool will not service the older Paccar PX-series engines (those are rebranded Cummins ISL/ISC and use different seal geometry) or the newer MX-11 engine, which has a different rear seal carrier design. Confirm engine ID before ordering — when in doubt, call Apex at 812-579-5478 to verify fitment.
🔧 PRO TIP — Pre-Lube Every Seal
Before pressing any new crankshaft seal, dunk the lip in clean engine oil and rotate the seal slowly to coat the entire sealing surface. Then wipe a film of the same oil onto the wear sleeve. This single 10-second step extends seal life by 30–50% by preventing dry-start scuffing the first time the crank turns. Never use grease — it traps abrasive contaminants and degrades the seal elastomer over time.
Safety & Shop Best Practices
Lockout / Tagout: Always disconnect both battery banks and lock out the ignition before any work near the crankshaft. The MX13's automatic engine protection system will not save you from a starter motor cranking the engine while your hand is in the timing cover.
Cleanliness is Everything: The seal bore must be surgically clean. One piece of debris between the seal OD and the bore creates a leak path that will never seal, no matter how perfectly the seal was pressed. Cover the open seal bore with a clean shop rag any time you step away from the job.
Always Replace TTY Fasteners: Harmonic balancer bolts and flywheel bolts on the MX13 are torque-to-yield. They stretch into their working zone on first use and cannot be reliably re-torqued. New bolts every time — no exceptions. Paccar publishes specific part numbers and torque sequences in the service manual for your build year.
Document the Repair: Photograph the wear sleeve, seal bore, and finished installation. If the seal ever does come back leaking, you have visual proof that the work was done correctly — and a baseline for diagnosing what changed.
Storage of the ATC1453185: Wipe the tool down with a light oil after each use, store in a closed case or drawer, and inspect the threads and pilot surfaces periodically. A precision tool stored carelessly becomes a sloppy tool — and a sloppy tool produces sloppy seal installations.
Cleanliness Procedure — The Step Most Shops Skip
If we had to identify the single highest-leverage improvement most shops could make on Paccar MX13 crank seal work, it would not be the tool — it would be how the seal bore gets cleaned before the new seal goes in. Here's the procedure that separates a 700,000-mile seal from a 7,000-mile leaker:
Step A: After seal removal, vacuum out any debris from the bore with a clean shop vacuum. Don't blow it out with compressed air — compressed air drives particulates deeper into engine surfaces and risks rust contamination from un-filtered shop air.
Step B: Wipe the bore with a lint-free shop towel soaked in fresh brake cleaner. Use multiple towels until they come out perfectly clean — no residue, no fibers, no oil film.
Step C: Inspect the bore under good light for any nicks, burrs, or scoring. Knock down any imperfection with a fine deburring stone — never use sandpaper or a die grinder, which leaves abrasive residue.
Step D: Final wipe with a clean lint-free towel. The bore should be visibly dry and clean. Cover with a clean rag while you prep the new seal.
Step E: Inspect the wear sleeve. Run a fingernail across the seal contact area — if you can feel any wear groove, the sleeve is done. Replace it before installing the new seal. There is no field repair for a worn chrome sleeve on the MX13.
Following this five-step prep adds maybe seven minutes to the job. Skipping it adds a 100% comeback rate.
When to Use the ATC1453185 vs. Outsource the Job
Most independent shops can absolutely handle Paccar MX13 crank seal work in-house with the ATC1453185 — that's the entire reason this tool exists. The few situations where outsourcing makes more sense:
- Severe wear sleeve damage: If the sleeve groove is deep enough that wear sleeve replacement is required, and your shop doesn't stock the sleeve installer tooling, factor that into the build-vs-outsource decision.
- Crankshaft snout damage: If the crank snout shows scoring deep enough to compromise sealing surface, a crank replacement may be in the cards — which is short-block territory.
- Lack of TTY torque measurement equipment: If your shop doesn't have a calibrated torque-angle adapter, defer until you do. The harmonic balancer and flywheel bolts cannot be done with a guess.
For routine seal replacement on a healthy crank with a serviceable wear sleeve — which is 90%+ of all MX13 crank seal jobs — the ATC1453185 puts the work right in your bay.
Frequently Asked Questions — Technician Edition
Q: Can I use the ATC1453185 on a Paccar MX-11?
A: No. The MX-11 uses a different rear seal carrier and front cover geometry. The ATC1453185 is engineered specifically for the MX/MX13/MX-13 PCI/MX PMCI-2 family.
Q: Do I need to remove the front gear housing to service the front seal?
A: No. The front crankshaft seal services in-place once the harmonic balancer is off. The ATC1453185 is designed for that exact workflow.
Q: How do I know the seal is at the correct depth?
A: The ATC1453185 has a built-in depth stop. When the stop contacts the housing, you're at Paccar's published spec — stop pressing immediately.
Q: Can I reuse the harmonic balancer bolt?
A: No. It's a torque-to-yield (TTY) fastener and must be replaced any time it's removed. Same goes for flywheel bolts on the rear.
Q: What's the torque spec for the harmonic balancer bolt?
A: Refer to your Paccar service manual for the specific build year — the procedure typically involves a multi-stage torque sequence ending in a torque-angle pass. Never guess on TTY fasteners.
Q: Is sealant required on the seal OD?
A: Usually no. Most MX13 builds use a dry-fit seal with built-in OD coating. Confirm against the current Paccar service bulletin for your specific build year before applying anything.
Q: How long should this seal last after a proper install?
A: Properly installed front and rear crankshaft seals on the MX13 routinely run 400,000–700,000 miles in normal duty cycles. Premature failures almost always trace back to installation error or unaddressed root causes (breather, sleeve damage, contamination).
Q: Where do I buy the ATC1453185?
A: Direct from Apex Tool Company — in stock at $900.00 with same-day shipping. Free continental U.S. shipping on orders over $500.
Do the Job Right. Once. With the Right Tool.
ATC1453185 — Front & Rear Crankshaft Seal Installer/Remover for Paccar MX13.
$900.00 — In Stock — Ships Today.
📞 812-579-5478 / 800-365-2233 | Mon–Fri 8 a.m. – 5 p.m. ET
overall rating:
my rating:
log in to rate