
The exact sequence, torque values, and engagement checks that keep a Series 60 valve train alive past 1.2 million miles. Written for techs who actually torque the fastener.
Why Series 60 Rocker Shaft Torque is Non-Negotiable
Series 60 valvetrain failures rarely announce themselves. They walk in as low oil pressure, a top-end tick, or a customer complaint about power loss — and they usually trace back to a fastener that was either under-torqued during assembly or never fully engaged by the socket that touched it. The rocker shaft sits on pedestals that locate the rocker geometry to the valve stems. Every degree of misalignment shows up as accelerated guide wear, broken bridges, or in the worst cases, a dropped valve.
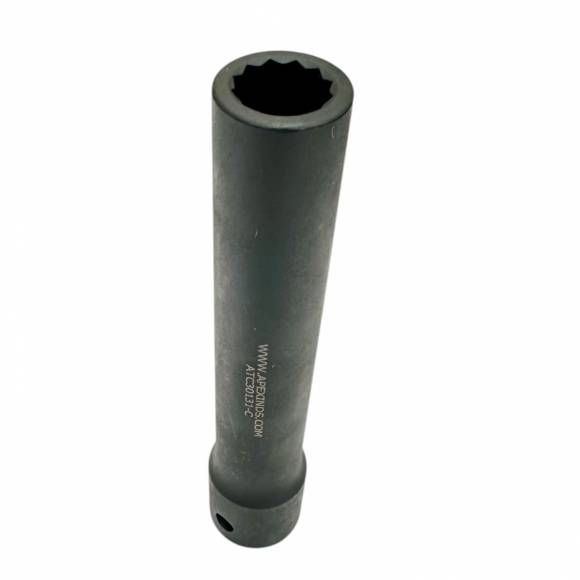
The Detroit Diesel service manual specifies a torque value for these fasteners, and that value assumes one thing the manual doesn't say out loud: that the tech is using a socket that actually fits. The ATC30131-C, OEM-equivalent to J-44706, is the socket the procedure was written around. Anything else introduces variables that compound across the eight fasteners holding the shaft to the head, and the only way to know your torque values mean something is to know your socket is fully seated and not contacting surrounding components. This guide walks the procedure as it should be performed — not as it's improvised when the right tool isn't in the drawer.
The Rocker Shaft Service Checklist
- Prepare the engine and access the valve train.
Bring the engine to top dead center on cylinder one if you'll be performing valve adjustment alongside the shaft work, then position it according to the service manual's marking. Disconnect the batteries — Series 60 EUI injectors carry control signals you don't want energized during disassembly. Remove the air intake plumbing as required to clear the valve cover. Remove the valve cover bolts in a cross pattern, then lift the cover straight up to avoid dragging it across the harness. Inspect the gasket condition for reuse or replacement. Clean the rocker box of any debris before progressing. Tools needed: 1/2-inch drive ratchet, valve cover socket set, clean shop towels, gasket scraper, parts tray. Common mistake: skipping the cover cleaning step lets debris fall into oil galleries when the shaft comes up. - Loosen the rocker shaft fasteners in the correct sequence.
Detroit Diesel specifies a reverse-of-tightening sequence for loosening — starting from the outermost fasteners and working inward, releasing each in three progressive passes. Attach the ATC30131-C to a 1/2-inch drive breaker bar or ratchet. Confirm full seating before applying load — the socket should bottom against the fastener shoulder, not the surrounding pedestal. Break each fastener loose with steady pressure, never with impact. The 12-point engagement distributes load across all flats, eliminating the rounded-corner failures common with worn 6-point sockets. Tools needed: ATC30131-C socket, 1/2-inch breaker bar, magnetic parts tray. Torque consideration: loosening doesn't require precise values, but tracking which fastener came from which position helps with reassembly diagnostics if anomalies surface. - Remove the rocker shaft assembly and inspect components.
Lift the rocker shaft assembly straight up off the pedestals. The shaft, rockers, and bridges come up as a unit on most service procedures. Lay it on a clean bench in the orientation it came out — don't flip or rotate parts. Inspect rocker tip wear, bridge guide pin condition, pedestal contact faces, and the studs themselves for any signs of stretch, thread damage, or galling. Series 60 studs that show necking or measurable elongation must be replaced — do not reuse stretched fasteners under any circumstance. Photograph the assembly before disassembly for reassembly reference. Tools needed: micrometer for stud diameter check, inspection light, parts diagram for reference, replacement fastener kit on standby. Common mistake: reusing studs without measuring them just because they "look fine" — necking isn't always visible to the eye. - Reassemble and torque to OEM specification.
With the head and pedestals clean, set the rocker shaft assembly back onto the pedestals in its original orientation. Hand-thread each fastener several turns before applying any tool — never start a fastener with a wrench. Attach the ATC30131-C to a calibrated torque wrench. Run the fasteners down in two progressive passes following the OEM tightening sequence — typically a center-out cross pattern. First pass at 50% of final torque, second pass at 100%. Always reference the current Detroit Diesel service manual for the exact torque value on your specific engine variant — values have varied across Series 60 generations. The 12-point engagement of the ATC30131-C ensures the torque value the wrench reads is the torque value the fastener actually receives. Tools needed: ATC30131-C socket, calibrated 1/2-inch drive torque wrench (covering the OEM torque range), torque sequence diagram. Common mistake: skipping the progressive pass and going straight to final torque — this twists the shaft and produces inconsistent clamp load across the assembly. - Verify valve lash and reinstall surrounding components.
After the rocker shaft is torqued to spec, perform valve lash adjustment per the service manual sequence — typically with the engine rotated to bring each cylinder to its adjustment position. With lash set on all valves, install a fresh valve cover gasket if the original showed any deformation, set the cover, and torque cover fasteners in cross pattern to the manual's spec. Reinstall any harness clips, intake plumbing, and accessory mounts removed during access. Reconnect batteries, then crank without starting for several seconds to build oil pressure into the gallery before the first fire. Tools needed: feeler gauge set, valve lash adjustment wrenches, torque wrench for valve cover, fresh gasket if needed. Common mistake: firing the engine before pre-lubrication — the rocker assembly runs dry for the first several seconds of operation, which on a freshly assembled engine accelerates wear on every contact surface in the valvetrain.
Troubleshooting Common Issues
Socket won't fully seat. If the ATC30131-C feels like it's bottoming on something other than the fastener shoulder, stop. Pull the socket and inspect the fastener for thread damage, debris in the recess, or carbon buildup around the head. A socket pushed against an obstruction will give false torque readings every time. Clean the recess with a small brass pick before retrying.
Torque wrench clicks early on a known-good fastener. This usually means the socket isn't engaging all twelve flats. Check for chips or wear in the socket flats, verify the fastener head hasn't been damaged by a previous tool, and confirm the torque wrench calibration is current. A wrench out of calibration is a documented contributor to Series 60 valve train comebacks.
Fastener feels loose after torque sequence. If a fastener loses tension between the second pass and final verification, the stud may be necking, the threads in the head may be damaged, or the pedestal contact face may be deformed. Pull the assembly and inspect before continuing. Don't chase the torque value by adding more turns — the shaft will distort and the comeback is guaranteed.
Rocker arm contacts socket during torque application. The stepped OD of the ATC30131-C is designed to clear surrounding components, but heavy carbon buildup or aftermarket rocker assemblies can change the clearance envelope. If contact occurs, stop immediately — applying torque while the socket is wedged against a rocker arm will distort both components. Verify pedestal cleanliness and rocker geometry before continuing.
Repeated valve lash drift after service. If valve lash won't stay in spec after a properly executed rocker shaft service, look upstream at the camshaft, lifters, and cam followers before suspecting the rocker work. Lash drift from a properly torqued shaft is rare — it points to wear elsewhere in the valvetrain rather than the rocker assembly itself.
Understanding Torque-to-Yield vs Torque-to-Spec on Series 60 Fasteners
One of the most consistent sources of error in Series 60 valve train service is conflating torque-to-yield fasteners with torque-to-spec fasteners. The two procedures look similar on the bench — wrench, socket, fastener — but the underlying engineering is different, and the implications for tool engagement are different.
Torque-to-spec fasteners are torqued to a static value derived from desired clamp load and friction coefficient assumptions. The fastener stays in its elastic range, and the torque value can be checked and re-checked against the same target. Most rocker shaft fasteners in the Series 60 platform fall in this category, which is why accurate socket engagement matters so much — the torque value the wrench reads has to equal the clamp load the fastener delivers, and partial engagement breaks that equation immediately.
Torque-to-yield fasteners, by contrast, are torqued past their elastic limit into a controlled plastic deformation zone, then often rotated an additional angle to a precise final position. Once installed, they cannot be reused — the metal has yielded. If your service procedure calls for a torque-plus-angle sequence on any Series 60 fastener, the rules are different: never reuse the fastener, never re-torque after the angle pass, and verify the OEM service bulletin for the specific procedure on your engine variant. The ATC30131-C handles both procedures equally well because the engagement geometry is identical — what changes is the wrench technique, not the socket.
Inspection Criteria You Can't Skip
Every time a rocker shaft comes off a Series 60, the assembly carries a story. Reading that story correctly determines whether the reinstall lasts 200,000 miles or 1.2 million.
Stud condition. Visual inspection isn't enough. Micrometer each stud at the necking point and compare to the unstressed shank. Any reduction indicates yield, and yielded studs go to the recycle bin — never the engine. Pay particular attention to studs near the front of the head, which see the highest thermal cycling.
Pedestal contact faces. The flat surfaces where the rocker shaft pedestals meet the head must be free of debris, gasket residue, and burrs. Any contamination changes the clamp load geometry. Wipe each face clean with a non-shedding shop towel, then inspect with a bright light at a low angle to catch any high spots.
Rocker tip wear pattern. The wear pattern on each rocker tip tells you whether the valve geometry was correct in service. Off-center wear, scalloping, or galling indicates upstream issues that won't be fixed by retorquing the shaft. Address those root causes before reassembly.
Bridge insert and guide pin condition. Series 60 valve bridges ride on guide pins, and worn pins or worn bridge bores allow the bridge to walk under load. Inspect both faces of every bridge and the pin condition on each cylinder. Replace any component showing measurable wear.
Tool Compatibility & Related Platforms
The ATC30131-C is application-specific to the Detroit Diesel Series 60. Within that platform family, it covers the full production span — early 11.1L engines through later 12.7L and 14.0L variants — because the rocker shaft fastener spec carried forward across generations. For DD13 and DD15 engines that followed the Series 60 in Detroit Diesel's heavy-duty lineup, different rocker service tooling applies; the cantilever puller and cam gear pilots in the Apex catalog cover those platforms.
If your shop services mixed Detroit Diesel fleets — Series 60 alongside DD13/DD15 work — keeping the ATC30131-C alongside the DD-series specialty tooling consolidates the rocker service inventory. Owner-operators rebuilding personally owned Series 60 engines typically buy this socket alone, since it covers the only Series 60 procedure that requires a specialty rocker stud tool. The 1/2-inch drive standard makes it compatible with the same torque wrenches and breaker bars already in any heavy-duty shop, so there's no auxiliary tooling required.
🛠 PRO-TIP — Verify Socket Engagement Before Loading
Before applying any torque or breaking force, push the ATC30131-C onto the fastener and rotate it 30 degrees by hand. If it clicks into a new flat smoothly with no resistance, you have full 12-point engagement. If it binds or skips, the socket isn't seated — pull it, clean the recess, and try again. This five-second check has saved more cylinder heads than any procedural change in the last decade.
Safety & Shop Best Practices
Rocker shaft service on a Series 60 isn't physically dangerous in the high-energy sense — there's no compressed spring waiting to launch — but the work environment carries its own risks. Hot engines burn hands. Old engine oil contains contaminants you don't want absorbing through skin. EUI fuel system components carry residual pressure that can spray if a return line is bumped. Cool the engine before disassembly, wear gloves rated for solvent and hot-surface contact, and follow lockout/tagout procedures if the engine is connected to a vehicle electrical system.
Cleanliness is the procedural safety issue. Any debris that falls into the rocker box has a direct path into the oil gallery once the engine fires. A clean valve cover, clean parts tray, and clean shop towels aren't aesthetic preferences — they're the difference between a successful rebuild and a contaminated oil system that wears bearings within hours. Keep the work area covered when the engine is open and uncovered.
Calibration is the other invisible safety issue. A torque wrench reading 165 ft-lb when it's actually applying 195 ft-lb will stretch studs into yield. Verify torque wrench calibration annually at minimum, and immediately after any drop or impact event. Document the calibration date on the wrench. The ATC30131-C will give you accurate torque transfer — the wrench has to do its part too.
Frequently Asked Questions
Q: What's the actual torque value for Series 60 rocker shaft fasteners?
Detroit Diesel torque values have varied across Series 60 production generations and service bulletins. Always reference the current service manual for your specific engine serial number range — published values can be revised, and using outdated specs is a documented cause of valve train comebacks.
Q: Can I use an impact wrench for final torque?
No. The ATC30131-C is impact-rated for loosening and assembly run-down, but final torque-to-spec must be performed with a calibrated click-type or beam-type torque wrench. Impact guns cannot deliver repeatable torque values within the tolerances Series 60 specifications require.
Q: How do I know if my rocker studs are stretched?
Measure the minor diameter at the necking point with a micrometer and compare to the unstressed shank diameter. Any measurable reduction indicates yielding. Document measurements during disassembly so you have a baseline if questions surface later.
Q: Should I replace rocker fasteners every service?
Detroit Diesel position varies by fastener type. Some are torque-to-yield and must be replaced; others can be reused if they measure within spec. Reference the service manual for the specific fastener part number and reuse policy.
Q: Does the stepped OD design affect long-term durability?
No. The step is machined into the OD, not stamped or formed — the wall thickness at the engagement point retains full strength. The tool is built for repeated torque cycles in professional shop use.
Q: Can I rent this tool instead of buying?
For one-time owner-operator rebuilds the math sometimes favors rental, but most shops doing any volume of Series 60 work find the $58.00 purchase price recovers itself on the first job. Contact Apex for availability on tool programs if outright purchase isn't the right fit.
Q: What ships with the ATC30131-C?
The socket itself, packaged for shop use. No carrying case or auxiliary tooling — it's a single-purpose specialty socket that lives in your Series 60 toolbox.
Q: How fast does it ship?
In stock at Apex's warehouse, ships from inventory on order. US continental orders over $500 ship free. For order status and current lead times, call 812-579-5478 or 800-365-2233 Monday through Friday 8 a.m. to 5 p.m. ET.
The Right Socket for the Series 60 Rocker Service Procedure
ATC30131-C — OEM-equivalent J-44706 — $58.00, in stock, ships from Apex.
Order the ATC30131-C — $58.00📞 812-579-5478 / 800-365-2233 · Mon–Fri 8 a.m.–5 p.m. ET · Free shipping over $500