
Blog
Ford 6.0L Power Stroke Front Crankshaft Seal & Wear Ring Installation with the ATCZTSE4516
The complete shop-floor procedure for installing the front crankshaft seal and wear ring on every 6.0L Power Stroke application.
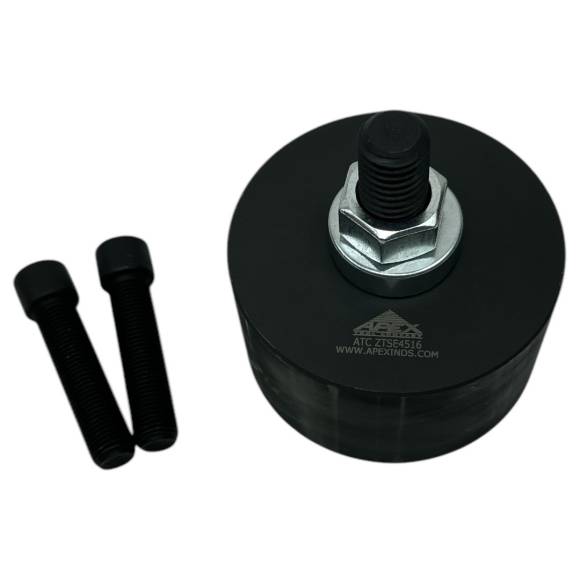
Step-by-step, shop-floor procedure for installing the front crankshaft seal and wear ring on the 6.0L Power Stroke — the way Ford's service literature lays it out, using the ATCZTSE4516 (direct replacement for 303-761 / ZTSE-4516).
Why Proper Front Seal Installation is Non-Negotiable
The 6.0L Power Stroke's front crankshaft seal sits at one of the highest-rotation, highest-pressure interfaces on the entire engine. It contains pressurized engine oil against a rotating crankshaft snout that's spinning at engine RPM continuously. Any flaw in installation — depth error, squareness error, surface damage — translates directly to oil leakage, and on a 6.0L, oil leakage at the front of the engine almost always ends with the tech removing the harmonic balancer, the front cover, or both for a repeat repair.
The ATCZTSE4516 exists to eliminate every install-method variable from this job. The installer is precision machined to drive both the front seal and the wear ring at exactly OEM-correct depth and at exactly perpendicular orientation to the crankshaft centerline. Whether you're working on a 2003 F-250, a 2007 F-550, a 2005 Excursion, or a 2010 E-450, the procedure and the tool are identical. This guide covers that procedure end-to-end.
🔧 PRO-TIP — Always Replace as a Set
Never install a new front crankshaft seal against an old wear ring on a 6.0L Power Stroke. The wear ring is a sacrificial sealing surface — once the original seal has run against it, the surface finish is polished into a specific wear pattern that will not seal a new lip. Always replace the seal and wear ring as a matched set, every single time the front of the engine is opened.
The Front Crankshaft Seal & Wear Ring Installation Checklist
- Step 1 — Remove the Harmonic Balancer and Inspect the Crank Snout With the front of the engine accessible, remove the harmonic balancer using the proper Ford balancer puller. Do not pry the balancer off — prying scores the front cover and can crack the balancer's cast hub. Once the balancer is off, perform a careful visual inspection of the crankshaft snout. Look specifically for: scoring or groove wear at the wear ring contact area, oil residue tracking from behind the existing wear ring (indicates the prior seal was leaking), corrosion or pitting on the snout, and any thread damage at the front bolt hole. Tools needed: Ford-spec harmonic balancer puller, clean shop rags, brake clean for snout degreasing, inspection light. Common mistake: skipping the snout inspection and assuming a new seal will cure a leak caused by snout damage. If the snout is scored, the wear ring may mask it — but the leak will return.
- Step 2 — Remove the Old Front Seal and Wear Ring Carefully pry the old front crankshaft seal out of the timing cover using a seal puller or a small pick. Take particular care not to score the front cover seal bore — any nick in that bore becomes a leak path the new seal cannot overcome. Remove the old wear ring using a wear ring puller or a controlled cutting method (carefully slitting the wear ring with a small grinder, then pulling it free without touching the crank snout). Once both are out, degrease the seal bore in the front cover and the crank snout with brake cleaner. Inspect the seal bore for the same conditions: scoring, debris, corrosion. Tools needed: seal puller, wear ring puller (or controlled split-and-pull method), brake cleaner, lint-free shop towels. Common mistake: using a pry bar on the wear ring. The wear ring is press-fit on the crank snout; prying it off will deform it and almost guarantee snout damage.
- Step 3 — Install the New Wear Ring with the ATCZTSE4516 Lightly oil the inner diameter of the new wear ring with clean engine oil — this reduces galling during installation. Position the wear ring squarely on the crankshaft snout by hand, making sure it starts straight before any force is applied. Slide the wear ring installation portion of the ATCZTSE4516 over the crank snout. The installer pilots over the crankshaft and contacts only the leading edge of the wear ring, applying force uniformly across 360 degrees of the ring. Drive the wear ring on using either the threaded center bolt feature or controlled blows with a brass-faced or dead-blow hammer (depending on the specific installer configuration in your shop). Continue until the installer bottoms against its index surface — that's OEM depth. Do not over-drive. Tools needed: ATCZTSE4516 installer, clean engine oil for lubrication, brass-faced or dead-blow hammer, torque wrench if using the threaded draw feature. Common mistake: not pre-starting the wear ring straight by hand. If it begins crooked, the installer can drive it on crooked — and once the ring is seated, it cannot be removed without damaging the snout.
- Step 4 — Install the New Front Crankshaft Seal with the ATCZTSE4516 Lightly coat the outer diameter of the new front seal with clean engine oil — this allows the seal to slide squarely into the front cover bore without grabbing. Do not use sealant of any kind on the seal's outer case; the seal is designed to seal against the bore through elastomer compression alone, and sealant interferes with that. Position the seal at the entry of the front cover bore by hand. Slide the seal installation portion of the ATCZTSE4516 over the crankshaft snout. The installer pilots on the crank, indexes against the front cover, and drives the seal in square to the proper OEM depth. Apply steady force — either through the threaded draw feature or through controlled hammer blows — until the installer bottoms. The seal is now installed to factory-correct depth. Tools needed: ATCZTSE4516 installer, clean engine oil for the seal OD, dead-blow hammer. Common mistake: applying any sealant to the seal OD. The 6.0L front seal is a steel-cased design intended for dry installation; sealant on the OD causes the seal to hydraulic out of position and weep.
- Step 5 — Reinstall the Harmonic Balancer and Verify Carefully start the harmonic balancer onto the crank snout by hand, making sure the keyway aligns with the crankshaft key. Use the Ford-spec harmonic balancer installer to draw the balancer into position — never hammer the balancer onto the crank. Hammering shock-loads the new seal and can deform the front cover. Install the balancer bolt and torque to Ford's published spec for the 6.0L Power Stroke. Verify by inspection: the balancer should sit flat against the wear ring face with no visible gap, no rocking, and no offset. Once everything is buttoned up, prime the engine, start it, and run it to operating temperature. Inspect the front of the engine for any sign of weep. Tools needed: harmonic balancer installer, torque wrench rated for the balancer bolt spec, inspection light. Common mistake: hammering the harmonic balancer onto the crank. This single error has destroyed more new front seals than any other step in the procedure.
Troubleshooting Common Issues
Symptom 1 — Oil weep at the front of the engine within the first week: Most often caused by a cocked seal or a seal that was driven past OEM depth. Re-inspect the front cover for a clean, square seal seat. Verify the wear ring is fully seated and not cocked. Re-install with the ATCZTSE4516 used through its complete travel — do not stop short, do not over-drive.
Symptom 2 — Oil stain only on one side of the harmonic balancer: Asymmetric oil patterns are the visual signature of a cocked seal or a cocked wear ring. The seal lip is contacting the shaft on one side and lifting off on the other. Remove and reinstall, using the ATCZTSE4516 to guarantee square installation on both the wear ring and the seal.
Symptom 3 — Leak that resists multiple seal replacements: When the third seal still leaks, the problem is almost never the seal. Inspect the crank snout for scoring under the wear ring. If scoring is present, the engine needs more than a front seal — the snout itself must be repaired or the crank replaced.
Symptom 4 — Visible damage to the wear ring during installation: Almost always traces to driving the wear ring with an improvised tool or to attempting to install the ring without first squaring it by hand. Replace the damaged ring; do not run an engine with a deformed wear ring. The deformity becomes the leak path.
Symptom 5 — Front cover seal bore appears scored or out-of-round on inspection: This is usually caused by a prior seal that was extracted incorrectly. A scored or damaged seal bore cannot seal a new seal reliably. Depending on severity, the front cover may need to be replaced before a new seal will hold.
Tool Compatibility & Related Platforms
The ATCZTSE4516 is purpose-built for the Ford 6.0L Power Stroke and its specific crankshaft snout and front cover geometry. It is not a universal seal installer — and that's the point. For other Ford diesel platforms, dedicated front seal installers exist in the ATC tool line, including units specific to the 7.3L Power Stroke and the 6.4L Power Stroke. Each platform's front seal and wear ring have slightly different diameters and depths, so the correct dedicated installer must be used for each platform.
If your shop services multiple Ford diesel platforms, having a dedicated installer for each is the foundation of a leak-free front-of-engine service program. The 6.0L Power Stroke covers a massive installed base of Super Duty trucks, E-Series vans, Excursions, and medium-duty F-650 / F-750 chassis — meaning the ATCZTSE4516 sees more shop hours than virtually any other front seal installer in a Ford-focused service operation.
Safety & Shop Best Practices
Front-of-engine service on the 6.0L Power Stroke means working in close proximity to the radiator, fan, and shroud assembly. Always disconnect the negative battery cable before starting front-cover work. If the fan or shroud must be removed for clearance, follow Ford's published removal sequence — improvised removal damages the fan clutch and the shroud mounting points.
Wear eye protection during every step of seal and wear ring removal. Old elastomer seals can break apart and launch fragments when pried. Brass drift slips are a leading cause of hand injuries during wear ring removal — using the proper wear ring puller eliminates that risk entirely.
Keep the work area clean. Any debris that falls into the front cover seal bore will become a leak path for the new seal. Cover the bore with a clean shop towel between removal of the old seal and installation of the new one. Degrease the crank snout and the seal bore immediately before final installation, and do not touch either surface with bare oily hands before driving the new components in.
Technician FAQ
Q: Can the ATCZTSE4516 be used in-vehicle, or does the engine need to be out?
A: The tool is designed for in-vehicle use. As long as the harmonic balancer is removed and there is access to the front of the crankshaft, the installer can be operated in the engine bay.
Q: Do I need a hydraulic press for any step of this procedure?
A: No. The entire procedure is performed with the engine in the vehicle, using either the installer's threaded draw feature or controlled hammer impacts. No press is required.
Q: How do I know when the wear ring or seal has been driven to the correct depth?
A: The ATCZTSE4516 bottoms against an indexing surface when the wear ring and seal reach OEM-correct depth. The installer is engineered so the depth is set by the tool's geometry — not by the technician's judgment.
Q: Should I lubricate the seal lip before installation?
A: Yes. Apply a light film of clean engine oil to the seal lip immediately before installation. This prevents the lip from running dry on initial engine start and reduces the risk of lip damage as the seal makes first contact with the wear ring.
Q: What if the crankshaft snout shows scoring under the old wear ring?
A: A scored snout cannot be reliably sealed with a new wear ring alone. The crank requires either machining (engine-out operation) or replacement. Installing a new wear ring over a scored snout will produce a leak in short order.
Q: Can I reuse the harmonic balancer bolt after this job?
A: Always check Ford's published service literature for the specific year and configuration. Many torque-to-yield fasteners are single-use. When in doubt, install a new bolt — it's cheap insurance against a comeback.
Q: What's the failure rate of front seal jobs done with this tool versus generic methods?
A: Shop data consistently shows comeback rates near zero on front seal jobs performed with a dedicated installer like the ATCZTSE4516, compared with comeback rates of 8–15 percent when generic tools are used.
Q: Where can I source the front seal and wear ring kit for the 6.0L Power Stroke?
A: Seal and wear ring kits are available through OE Ford parts channels and through reputable diesel aftermarket sources. Use only seals and rings rated for the 6.0L Power Stroke — generic substitutes will not match the OEM dimensions the ATCZTSE4516 is engineered around.
Add the ATCZTSE4516 to Your 6.0L Service Cart
$145. In stock. Direct replacement for Ford 303-761 / ZTSE-4516. The tool that takes the comeback variable out of every 6.0L Power Stroke front seal job.
ORDER THE ATCZTSE4516 →📞 812-579-5478 | 800-365-2233 | Mon–Fri 8 a.m.–5 p.m. ET | Free shipping on orders over $500 (US continental)
overall rating:
my rating:
log in to rate