

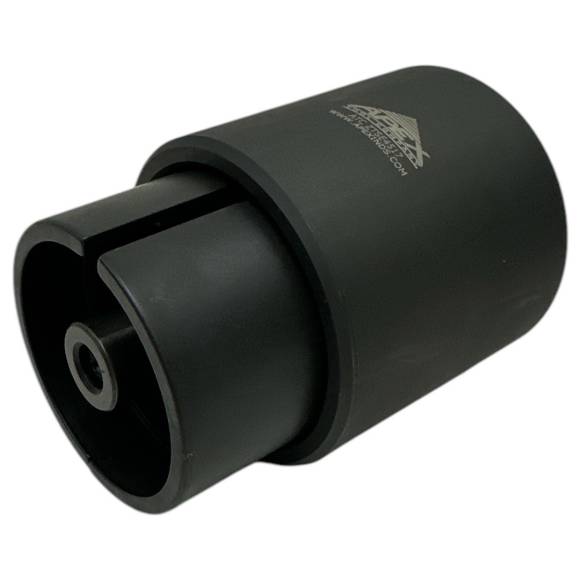
Why Proper Front Seal Removal Is Non-Negotiable
On a 6.0L Power Stroke, the front crankshaft seal job lives or dies in the removal step. The replacement seal and wear ring are inexpensive and straightforward to install — but if you damage the crank snout or the front cover seal bore getting the old parts out, you've turned a one-hour task into a teardown. The ATCZTSE4517 (OEM equivalent to ZTSE-4517 and Ford 303-762) exists for exactly one reason: to pull the seal and wear ring with controlled, concentric force so the surfaces the new seal depends on come out of the job untouched. This guide walks the full procedure the way it runs in a professional bay.
The Front Seal & Wear Ring Removal Checklist
- Prep the engine and gain access. Disconnect the battery and let the engine cool fully — you're working at the front of the block with belt and accessory components in the way. Remove the cooling fan and shroud, then release tension and remove the serpentine belt. Tools needed: standard metric sockets and wrenches, a serpentine belt tool, and shop towels to manage residual coolant or oil. Common mistake: rushing this stage and nicking the radiator or fan clutch — give yourself room to work square to the crank.
- Remove the harmonic balancer. The balancer (damper) covers the front seal and must come off to access it. Remove the large center damper bolt, then use a proper harmonic balancer puller — never pry the damper off, which loads and can crack it. Note that the 6.0L damper retaining bolt is a torque-to-yield fastener; plan to follow the OEM torque-and-angle sequence on reassembly and replace the bolt if your service procedure calls for it. Always verify final torque against current Ford service specifications. Common mistake: reusing a stretched TTY bolt or guessing the torque — both invite a loose damper and a repeat failure.
- Set up the ATCZTSE4517 and extract the seal. With the damper off and the seal exposed, position the ATCZTSE4517 so its pull is concentric to the crankshaft axis. Engage the tool on the seal/wear ring per the tool's design and draw the components straight out using controlled force — no impact, no angle, no prying against the bore. The concentric load is what keeps the snout and bore pristine. Common mistake: letting the tool sit cocked; confirm it's centered before applying force.
- Remove the wear ring and inspect the surfaces. Extract the wear ring with the same controlled approach — remember, this is a two-part service, and leaving an old grooved wear ring in place is the number-one cause of repeat leaks. With both components out, clean the crank snout and seal bore thoroughly. Inspect the snout for scoring and the front cover bore for roundness and burrs. A clean, undamaged pair of surfaces is your green light to proceed. Common mistake: skipping the wear ring or reassembling over residual oil film.
- Prepare for a square reinstall. Removal done correctly sets up a clean install. Stage the new wear ring and seal with the correct installer/sizing tooling, lubricate per the seal manufacturer's instructions, and drive the components to the specified depth — square, not cocked. Reinstall the harmonic balancer following the OEM torque-to-yield procedure, reinstall the serpentine belt and fan, reconnect the battery, and run the engine to verify a dry front cover. Common mistake: installing the seal at the wrong depth or out of square, which reintroduces the very leak you just fixed.
🔧 PRO TIP
Before you pull the old seal, mark its installed depth with a marker on the crank snout or note it against the bore. Aluminum front covers can wear a faint groove from the original seal; setting the new seal slightly deeper (within spec) lets the lip ride on fresh, unworn wear-ring surface — eliminating a leak path before it starts. And always replace the wear ring with the seal — never one without the other.
Troubleshooting Common Issues
Symptom: New seal leaks again within a few thousand miles
Usual culprits: the wear ring was reused (or not replaced at all), the seal was installed cocked or at the wrong depth, or the bore was distorted during removal. Pull the damper, inspect the wear surface, and confirm the bore is round. This is precisely the failure chain the ATCZTSE4517 prevents on removal.
Symptom: Oil on the serpentine belt / belt squeal after repair
Residual oil that wasn't cleaned before reassembly will soak the new belt and mimic a failed reseal. Confirm the leak is actually gone by degreasing the area, running the engine, and re-inspecting. If oil returns, the seal itself is the issue, not contamination.
Symptom: Front cover seep vs. true seal leak — diagnosing the source
Oil at the front of the engine can come from the seal, the front cover gasket, or fittings above it migrating down. Clean everything, dust with UV dye or talc, and run the engine to pinpoint the origin before you commit to a seal job. Don't pull a damper to chase a leak that's coming from above.
Symptom: Damper hub is grooved where the seal rides
If the wear ring was ever omitted, the seal lip can cut a groove into the hub or snout. A grooved sealing surface won't hold a new seal. Correct it with a fresh wear ring; if the snout itself is damaged, escalate to crankshaft inspection.
Symptom: Seal won't release cleanly during removal
Heat-baked seals can grip hard. Resist the urge to grab a pick or pry bar — that's how snouts get scored. Re-seat the ATCZTSE4517, confirm it's concentric, and apply steady controlled force. The tool is designed to break the seal free without sideloading the bore.
Tool Compatibility & Variations
The ATCZTSE4517 services the full 6.0L Power Stroke family: Ford Super Duty F-250/F-350/F-450/F-550 (2003–2007), F-650/F-750 (2004–2007), E-Series vans E-150 through E-450 (2004–2010), and Excursion (2003–2005). Because the 6.0L is built on the Navistar VT365 platform, the tool also covers VT365 / MaxxForce 7 applications where the front seal and wear ring design matches the 303-762-style tooling. The related 4.5L Power Stroke Low Cab Forward (2006–2009) shares the same service philosophy. As a direct replacement for OEM ZTSE-4517 and Ford Rotunda 303-762, it slots straight into procedures your service literature already references — no cross-walking part numbers.
Safety & Shop Best Practices
Always disconnect the battery before working at the front of the engine and let the engine cool completely — coolant and oil at the front cover are hot. Support the vehicle properly and keep your body clear of the crank centerline when applying pull force. Never substitute impact or prying for the controlled extraction the tool provides; the entire point is to keep sideload off the bore and snout. Inspect the ATCZTSE4517 for wear before each use, keep its threads and engagement surfaces clean, and store it dry. Use new TTY hardware where specified, torque the damper to OEM spec with a calibrated wrench, and document the repair for fleet records.
FAQ Section
Q: Can I remove the front seal without removing the harmonic balancer?
No. The balancer sits over the seal and must come off to access and extract the seal and wear ring.
Q: Do I really have to replace the wear ring every time?
Yes. The seal lip wears a groove into the ring; reusing it puts a new lip in an old worn track and guarantees a leak. Replace both together.
Q: What torque does the 6.0L damper bolt take?
It's a torque-to-yield fastener requiring an initial torque plus an angle sequence. Always pull the current Ford service spec and use a calibrated torque wrench and angle gauge — and replace the bolt if the procedure calls for it.
Q: Will the ATCZTSE4517 score the crankshaft?
Not when used as designed. Its concentric, controlled pull is engineered specifically to avoid scoring the snout and distorting the bore.
Q: Is this tool only for full overhauls?
No. It's used for standalone front oil-leak repairs as well as during inframe/outframe overhauls whenever the front of the engine is accessed.
Q: Can one tool handle a whole fleet's worth of 6.0L jobs?
Yes. Heavy-duty steel construction is built for repeatable professional use across fleet, dealership, and rebuild operations.
Q: Does it fit the 4.5L Power Stroke LCF?
The 4.5L LCF (2006–2009) is a listed compatible application; confirm the specific seal/wear ring design matches before service.
Q: What's the difference between this and a generic seal puller?
A generic puller doesn't control concentricity for the 6.0L geometry. The ATCZTSE4517 is purpose-built to the ZTSE-4517 / 303-762 design so the pull is straight and surface-safe every time.
Do the Job Once. Do It Right.
Equip your bay with the ATCZTSE4517 Front Crankshaft Seal & Wear Ring Remover — OEM-equivalent to ZTSE-4517 / 303-762. Just $200.00, In Stock.
Get the ATCZTSE4517 — $200.00 →
📞 812-579-5478 / 800-365-2233 | Mon–Fri 8 a.m.–5 p.m. ET
🚚 Free shipping on orders over $500 (US continental)