Blog
Cummins ISX15 / X15 / QSX15 Fuel Pump Timing Procedure with the ATC 5572562
The full shop-floor procedure every Cummins technician should know.

A step-by-step shop-floor procedure for accurately timing the XPI and Next-Gen high-pressure fuel pump on Cummins ISX15, X15, and QSX15 engines using the ATC 5572562 — the same operation Cummins-certified rebuilders run on every dock.
Why Fuel Pump Timing is Non-Negotiable on the Cummins 15-Litre Platform
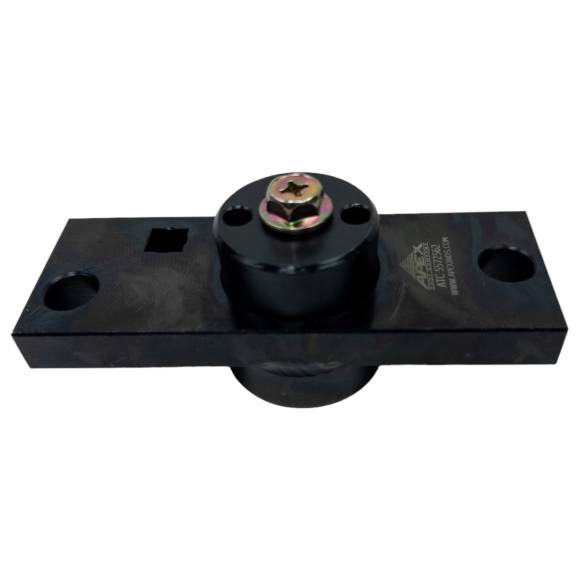
The Cummins ISX15, X15, and QSX15 use a precision gear-driven high-pressure fuel pump — either the original XPI design or the updated Next-Gen unit — feeding common-rail injectors at pressures north of 36,000 PSI. The pump's drive gear is mechanically tied to the engine's gear train, which means its angular relationship to the crankshaft and camshaft determines exactly when fuel pressure peaks relative to injection events. Get that relationship wrong by even a single tooth on the gear, and the engine will run — but it will run badly, wear abnormally, and eventually fail catastrophically. The ATC 5572562 is the dedicated locking and alignment fixture that makes the indexing operation repeatable, deterministic, and Cummins-spec accurate. This guide walks through the complete shop procedure from initial preparation to final verification, with the troubleshooting, torque specs, and safety practices that prevent the most common shop-floor mistakes.
The ATC 5572562 Fuel Pump Timing Checklist
- Bring the Engine to TDC Reference and Confirm Crankshaft Position.
Before any fuel pump work begins, the engine must be brought to its timing reference position. On the ISX15 / X15 / QSX15, this is typically TDC compression on cylinder #1, verified at the front pulley timing mark and confirmed through the crankshaft locking pin port on the lower block. Tools needed: crankshaft barring tool (ATC offers a dedicated barring socket), TDC pin, breaker bar, and a clean shop light. Slowly bar the engine over in its rotational direction (clockwise from the front) until the timing mark aligns and the TDC pin drops freely into its locating bore. Confirm the lock by attempting gentle reverse rotation — the engine should not move. Common mistake: bumping the engine past TDC with the starter motor; never use the starter to set timing position, always bar by hand. Re-verify by checking that both intake and exhaust valves on cylinder #1 are closed (rocker arms slack), confirming you're on the compression stroke, not the exhaust stroke 360 degrees away. - Access the Fuel Pump Drive and Remove the Existing Pump (if applicable).
With the engine locked at TDC, remove the high-pressure fuel lines from the pump outlet — cap every fitting immediately to prevent contamination. Disconnect the pump electrical connectors (suction control valve, fuel rail pressure sensor harness as required). Loosen the pump-to-block mounting bolts in a star pattern to relieve any stored torque, then fully back them out. The pump separates from the gear-train interface with a slight pull — do not pry against soft aluminum surfaces. Inspect the pump drive gear teeth and the mating gear in the housing for any signs of pitting, chipping, or abnormal wear before continuing. Tools needed: 13mm and 16mm sockets, fuel line cap kit, magnetic parts tray, lint-free shop rags. Common mistake: removing the pump with the engine off TDC — this allows the gear train to relax and complicates re-indexing dramatically. - Install the ATC 5572562 to Lock the Pump Gear Train at Spec Position.
With the pump removed and the engine still locked at TDC, install the ATC 5572562 Fuel Pump Timing Tool onto the exposed pump drive interface. The tool indexes into the gear train at the factory-specified reference position, mechanically holding the drive gear so the replacement pump can be installed at exactly the correct phase relationship. Seat the tool fully against its locating surface; verify no foreign material — gasket residue, sealant, debris — is interfering with proper seating. The tool should engage smoothly and without forcing. If it does not seat cleanly, the gear train is not at the correct indexing position and you must re-verify crankshaft TDC before proceeding. Common mistake: forcing the tool into engagement when the gear train is off-position; this can damage gear teeth and the tool itself. - Install the Replacement Fuel Pump Against the Locked Reference.
With the ATC 5572562 holding the gear train at Cummins-spec position, install the replacement XPI or Next-Gen pump. Use a new mounting gasket and any required O-rings — never reuse fuel system sealing surfaces. Start all mounting bolts by hand to ensure the pump seats flat without cross-threading. Tighten in a star pattern, in two stages: snug to ~15 N·m initial pass, then to final spec — typically 43 N·m (32 ft-lbs) for the pump mounting bolts on most ISX15 / X15 / QSX15 variants, but always confirm against the Cummins service manual revision for your specific engine serial number. The pump drive gear will engage the held gear train through the timing tool's reference, guaranteeing correct indexing. Common mistake: tightening mounting bolts before the pump fully seats; this can shear the locating dowels and result in a misaligned pump that will fail prematurely. - Remove the Timing Tool, Reassemble, and Verify.
With the pump fully torqued to spec and confirmed seated, remove the ATC 5572562 timing tool. Reinstall any access covers, fuel lines (to spec torque — typically 30-35 N·m for the high-pressure side, but verify), electrical connectors, and the crankshaft TDC pin. Pull the crankshaft TDC pin from the block. Prime the fuel system per the Cummins service procedure — typically with the manual prime pump on the secondary filter housing — and verify no leaks. Crank the engine briefly without starting if procedure calls for a dry crank prime cycle; confirm no fault codes related to rail pressure or pump timing. Start the engine and listen carefully — a correctly timed pump produces a smooth, even injection sound with no metallic knock and no fuel smell. Run the engine to operating temperature and re-scan for codes. Common mistake: skipping the post-start scan; a small timing error may not throw an immediate code but will degrade injectors over weeks.
Troubleshooting Common Issues
Issue 1: The ATC 5572562 Will Not Seat Flush on the Gear Train. This almost always means the crankshaft is not exactly at TDC compression. Re-verify the TDC pin engagement, confirm intake/exhaust valve position on cylinder #1, and check that no rotation has occurred during pump removal. A secondary possibility is gasket residue or carbon buildup on the tool's locating surface — clean thoroughly with a lint-free wipe and brake clean before re-attempting installation. Forcing the tool past resistance damages the gear teeth.
Issue 2: Engine Runs Rough After Pump Reinstallation. If the engine starts but runs rough with no rail pressure codes, the most likely cause is air ingress in the high-pressure lines — re-prime the fuel system and bleed each injector line per the Cummins procedure. If rough running persists with active rail pressure variation codes (SPN 1347, 1349), suspect a timing tool error: re-verify TDC, re-install the timing tool, and confirm the pump gear engaged correctly. Less common but possible: a damaged or non-conforming gear during the prior pump operation.
Issue 3: Persistent Low Rail Pressure After Repair. Low rail pressure (SPN 157 FMI 18) after a fuel pump replacement using the ATC 5572562 points away from timing and toward another component — typically the suction control valve, a clogged low-pressure side filter, or an inlet metering problem. Verify low-side pump pressure first, then suction control valve operation. Confirm the high-pressure side is sealed at every joint. Timing errors generally show up as variation codes, not steady low-pressure codes.
Issue 4: Knock or Combustion Noise at Idle After Service. A consistent metallic knock following pump service indicates injection event mis-phasing. This is the textbook symptom of a fuel pump installed without the timing tool, or with the timing tool seated against incorrect engine position. The repair: pull the pump again, re-establish TDC on cylinder #1, install the ATC 5572562 correctly, and re-time the pump. Do not run the engine extensively in this condition — combustion noise of this type damages bearings rapidly.
Issue 5: Tool Damage or Wear After Repeated Use. The ATC 5572562 is built for heavy professional use, but like any precision fixture, it should be inspected periodically. Check the gear-engagement face for galling, the locating surface for distortion, and any locking features for free movement. A worn tool indexes inaccurately — replace if any measurable wear is evident on critical surfaces.
Tool Compatibility & Engine Platform Variations
The ATC 5572562 covers the full Cummins 15-litre heavy-duty family used in on-highway and off-highway applications. Specific platform coverage:
ISX15 CM2250. The original CM2250 ECM-controlled platform, primarily 2010-2012 model years in Class 8 on-highway tractors. Standard XPI pump configuration. ATC 5572562 is a direct fit.
ISX15 CM2350. The updated CM2350 platform with refined fuel system controls, primarily 2013 and later. Compatible with both XPI and later Next-Gen pump installations. ATC 5572562 indexes both.
X15 (Performance & Efficiency Series). The 2017+ rebranded platform with Performance and Efficiency variants. Both share the gear-drive interface architecture with the ISX15. The ATC 5572562 is the correct timing fixture.
QSX15. The off-highway variant used in mining haul trucks, large gen-sets, marine propulsion, and construction equipment. Shares the same fuel pump drive geometry as the on-highway platforms; the ATC 5572562 is the correct service tool.
🛠 PRO TIP — From a 25-Year Cummins Rebuild Tech
Always engrave or tag your ATC 5572562 with the date you put it in service and a serial number. In a high-volume shop, you'll cycle this tool hundreds of times, and knowing its service history lets you swap it out preventively before wear introduces a fractional-degree error. The cost of a replacement tool is nothing compared to one mis-timed warranty job — and a clean tool log is the kind of detail Cummins reps notice during warranty audits. Bonus: keep the tool in its own labeled case, never tossed in a drawer with sockets that can ding the locating surfaces.
Safety & Shop Best Practices
Fuel System Pressure. The Cummins XPI / Next-Gen common-rail system holds residual pressure even after engine shutdown. Always relieve fuel rail pressure per the Cummins service procedure before disconnecting any high-pressure line. A direct rail leak at 36,000 PSI will penetrate skin and inject diesel into tissue — a medical emergency.
Cleanliness Protocol. Common-rail fuel systems are catastrophically intolerant of contamination. Every disconnected fitting must be capped within seconds. Use only Cummins-approved or equivalent lint-free wipes. Never use compressed shop air on any fuel system component — it forces moisture and particulate into surfaces that must remain clean. Single particle of dirt larger than 5 microns can score an injector beyond repair.
Personal Protective Equipment. Eye protection is mandatory anytime fuel lines are disconnected. Nitrile gloves protect skin from diesel and ULSD's known dermal irritants. Hearing protection for any extended cranking or run-up cycles.
Engine Cooldown. Never service the fuel pump on a hot engine. Cummins 15-litre engines retain significant heat in the gear case; surface temperatures can exceed 200°F for hours after shutdown. Allow full cooldown before tool engagement to prevent burns and to ensure dimensional accuracy of the timing fixture.
Documentation Discipline. Photograph the pump and gear-train orientation before disassembly. Record the engine's serial number and ECM software level. Note ambient temperature and any environmental conditions during the procedure. This documentation supports warranty claims and serves as your defense if the customer's truck returns with a fuel system fault unrelated to your work.
Frequently Asked Questions
Q1: Do I need the engine at exact TDC, or is "close" acceptable?
Exact TDC. The crankshaft locking pin or front-pulley timing mark must engage cleanly with zero rotational play. "Close" introduces fractional-degree errors that compound across the gear train into measurable mis-timing at the pump.
Q2: Can I use the ATC 5572562 on the older ISX (pre-CM2250) platforms?
No. The pre-CM2250 ISX engines used different fuel system architecture (HPI / open-nozzle injection on early units, then Bosch CRIN common-rail on later EGR engines). The ATC 5572562 is specific to the XPI / Next-Gen gear-driven pump architecture used on ISX15 CM2250+, X15, and QSX15. Verify your engine family number before use.
Q3: What's the torque spec for the fuel pump mounting bolts?
Typically 43 N·m (32 ft-lbs) for ISX15 / X15 / QSX15 XPI pump mounting bolts, applied in two stages with a star pattern. Always confirm against the current Cummins service manual revision for your specific engine serial number — Cummins occasionally updates fastener torque procedures.
Q4: Is the procedure different for the Next-Gen pump vs. the original XPI?
The timing operation itself is the same — the gear-drive interface and indexing geometry are unchanged between XPI and Next-Gen. What differs is the fuel line routing, the suction control valve location, and the electrical connector configuration. The ATC 5572562 covers both.
Q5: Can one technician do the procedure, or does it require two?
One experienced technician can complete the procedure safely. A second set of hands accelerates the work — particularly during pump removal and reinstallation — but is not strictly required. Always work cleanly, never rush the cap-the-fitting protocol, and document each step.
Q6: How long should the complete procedure take?
Allow 2-3 hours for an experienced Cummins technician on a clean bench, including system priming, leak verification, and code scanning. First-time technicians should budget 4-5 hours and work through the procedure deliberately.
Q7: Does the timing tool wear out, and how do I know?
Hardened tool steel construction makes the ATC 5572562 extremely durable, but any precision fixture eventually wears. Inspect the gear-engagement face under good light every 50-100 uses. Replace if you see galling, distortion, or material loss. A worn tool indexes inaccurately and defeats its purpose.
Q8: What if I don't have the Cummins service manual for the engine I'm working on?
You should have it. The ATC 5572562 is a precision tool that supports the Cummins service procedure — it doesn't replace it. The service manual contains torque specs, code definitions, priming procedures, and platform-specific notes that the timing tool alone cannot. Cummins QuickServe Online and authorized service literature are essential references for any 15-litre work.
Add the ATC 5572562 to Your Cummins Service Bench Today
Direct OEM 5572562 / 5572664 replacement. Built for daily heavy-duty shop use. The dedicated timing fixture every ISX15, X15, and QSX15 rebuild deserves.
Order the ATC 5572562 — $285.00 →📞 812-579-5478 | Mon–Fri 8 a.m. – 5 p.m. ET |
overall rating:
my rating:
log in to rate