Blog
Uses of the automotive test kit

The cooling system on an automobile is one of the most misunderstood and is often neglected. Contrary to popular belief, the water pump does not pressurize the system. Rather, it merely circulates the coolant. The running engine heats up the coolant, causing it to expand and pressurize the cooling system, as the coolant seeks a way out. To prevent the coolant from overheating, the cooling fans remove the heat, while a pressure cap maintains the pressure in the system.
This needs a careful balance to be maintained so that the engine runs neither too hot nor too cold. The integrity of the pressure cap is important in keeping the system balanced at the right temperature, the same way that the manufacturer had established during the initial design and testing processes.
Testing the Pressure Cap with an Automotive Test Kit
For testing a typical pressure cap, you will need the following:
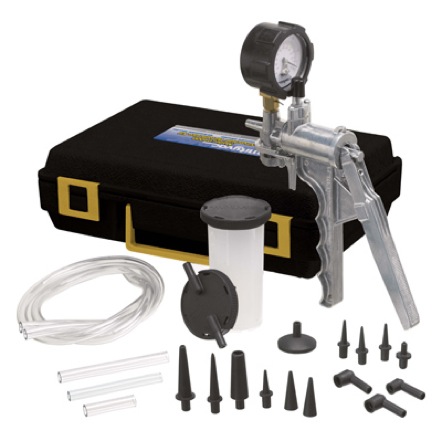
• An automotive test kit including a hand-held pressure/vacuum pump
• A length of vacuum/pressure hose (part of kit) – use with a fitting hose clamp to adapt the pump to the overflow hose
• Specification data from the manufacturer (usually printed on the pressure cap)
A word of warning: Never perform these tests on an overheated or a hot engine. Prevent burns from steam or hot liquid by making sure that the vehicle has cooled down sufficiently.
General Test Procedures
1. Inspect the pressure cap thoroughly for any signs of cracks or distortions on the seal. You will have to remove the cap from the radiator or pressure tank for this. Replace the seal if necessary and replace the cap before testing further.
2. Unplug the overflow hose first and then plug in the test kit using the hose clamps and the length of vacuum hose. If the pressure cap you are testing were on the top of a tank assembly, the smallest hose attached near the top would be the overflow hose.
3. After properly connecting the hose, set the test kit to the 'pressure' position, and pump until the pressure reaches the limit printed on the cap.
4. As you reach this limit, the pressure cap should release air with an audible noise. That indicates the pressure cap is working normally. A non-functioning cap will release the pressure either too quickly or not at all. Some new caps do fail this test.
5. This pressure test also allows you to check the entire system visually for leaks.
Pressure Testing On an Evap System
The automotive industry has upgraded the requirements for emission testing all over the world. The technicians now need a hand-held pressure pump kit for testing with the new methods. Modern vehicle systems generally use pressures of about 25 psi or lower and use sensitive devices to convert this pressure to an electrical signal that the vehicle's computer system can use. By processing this electrical signal, the computer can make the necessary adjustments for keeping the engine running at its optimum performance.
The most common form of this device is the Evaporative Emission Sensor, which actually measures the pressure of fuel vapor present in the fuel tank of the vehicle. By testing this sensor, you can establish if the Evaporative Emission Sensor is working properly, detect if the fuel vapor hose is broken or whether the fuel cap is either missing or loose.
For testing the sensor, you will need:
• Published guidelines or manufacturer's data for the evaporative emission system
• Necessary tools for accessing the sensor
• A digital volt ohm meter (DVM)
• A hand-held pressure/vacuum pump
• A computer code reader to appropriately access the trouble codes
General Test Procedures
1. Inspect the entire system visually and make sure that there is no damage and everything is connected in their proper places, as it should be.
2. Verify that the computer system is set for an evaporative emission system code.
3. Inspect the fuel cap and make sure it is tight and undamaged.
4. Check all the connections on the evaporative emission sensor and inspect the wiring for frayed wires or damaged connectors.
5. Test the sensor according to the manufacturer's data using the pressure pump and the DVM. You will need to place the vehicle's key in the on position for the sensor to receive power.
6. Use the pressure/vacuum pump and apply pressure to the 'tank' side of the sensor while you attach the DVM.
7. The readings should be comparable to the data provided by the manufacturer.
To check your system quickly, let your engine run hot and pinch the radiator tube. If this causes and overflow of liquid, replace the radiator cap immediately.
overall rating:
my rating:
log in to rate