Tech Guide: Detroit Diesel DD13 / DD15 DT12 Clutch Alignment Procedure with the W950589006100

A bay-ready, step-by-step procedure for aligning the clutch disc and pilot bore on Detroit Diesel DD13 and DD15 engines paired with the DT12 automated manual transmission — using the ATC W950589006100 alignment tool.
Why DT12 Clutch Alignment is Non-Negotiable
The Detroit Diesel DT12 is an automated manual transmission. The mechanical clutch is still there — the difference is that an electronic actuator engages it instead of a driver's foot. That actuator measures travel, load, and engagement profile in real time, and it expects a clutch disc that sits dead center on the flywheel. When the disc is even slightly off-center, the input shaft loads up sideways at the pilot bearing the moment the transmission is bolted up, and the actuator's load curves go out of spec. The result is some combination of difficult installation, shift fault codes, premature clutch wear, and driveline vibration. None of those are acceptable on a customer's truck. The W950589006100 is the OEM-dimension reference tool that eliminates the variable: insert, seat the pressure plate, remove, install transmission. Done right, every time.
The DT12 Clutch Alignment Checklist
- Step 1 — Prep the flywheel and inspect the pilot bore.
Before the clutch ever sees the flywheel, clean the friction surface with a non-residue brake cleaner and inspect for heat checks, hot spots, or scoring. If you're reusing the flywheel, it should have been resurfaced or replaced per Detroit Diesel guidance. Inspect the pilot bore at the center of the crankshaft for damage, wear, or contamination. Replace the pilot bearing — this is not the place to save money. Tools needed: brake cleaner, lint-free shop towels, pilot bearing puller and installer, depth gauge for verifying pilot bearing seat depth. Common mistake: leaving residual oil on the friction surface, which contaminates the new disc on first engagement.
- Step 2 — Stage the clutch disc and pressure plate against the flywheel.
Lift the clutch disc into position with the marked side facing the flywheel — the disc is directional, and reversing it will prevent the pressure plate from clamping correctly. Hold the disc against the flywheel and lift the pressure plate into position over the dowel pins. Start the pressure plate bolts by hand only; do not begin torquing until alignment is verified. Tools needed: clutch lift or two-person handling, clean rags to prevent contamination, hand tools for starting bolts. Common mistake: cinching pressure plate bolts before the alignment tool is in place — once the disc is clamped, the alignment is locked in wherever it lands.
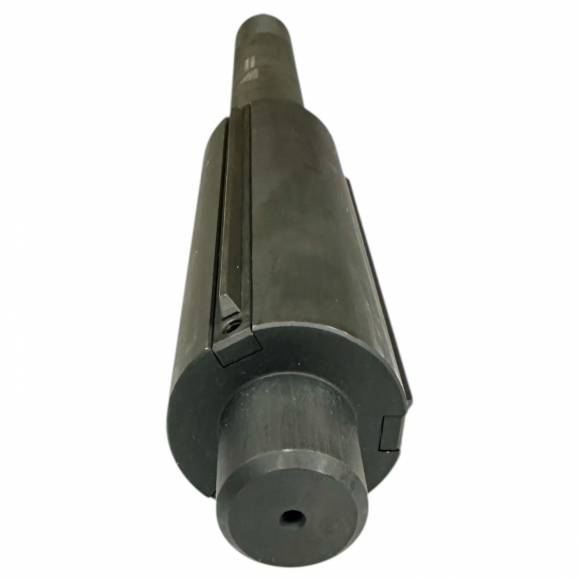
- Step 3 — Insert the W950589006100 through the disc hub into the pilot bore.
With the pressure plate bolts hand-tight and the disc free to shift, insert the W950589006100 spline-end first through the clutch disc hub. Continue advancing until the pilot tip seats fully into the pilot bearing bore. The tool should slide through the disc hub with light resistance and bottom in the pilot bore with a positive stop. If it binds, stop — back the tool out, recheck disc orientation, and verify the pilot bearing is properly seated and clean. Tools needed: the W950589006100 itself, a flashlight to verify pilot bore engagement, gloves to prevent oil transfer to the friction surfaces. Common mistake: forcing the tool when it binds — that almost always indicates a disc orientation or pilot bearing seating problem that will get worse, not better, when the transmission goes in.
- Step 4 — Torque the pressure plate to OEM spec in cross-pattern.
With the W950589006100 holding the disc indexed, torque the pressure plate bolts in a star or cross pattern, working in two or three passes up to the final spec specified in the Detroit Diesel service manual for the specific pressure plate in use. Even tightening across the bolt pattern prevents the pressure plate from cocking and pulling the disc off-center as it clamps down. Tools needed: calibrated click or digital torque wrench, the correct socket size for your pressure plate hardware, the current Detroit Diesel service publication for the engine model. Common mistake: skipping the multi-pass approach and going straight to final torque on the first pull — this can warp the pressure plate cover or pull the disc off the alignment tool's centerline.
- Step 5 — Withdraw the W950589006100 and verify free rotation.
With the pressure plate at final torque, pull the W950589006100 straight back out of the assembly. It should slide out with the same light resistance it went in with — heavy resistance or binding on the way out indicates the disc shifted during torquing and the procedure should be repeated. Once the tool is removed, verify the disc rotates freely on the flywheel by hand. The transmission is now ready to install. Tools needed: clean rag for the alignment tool before storage, light oil for protection. Common mistake: skipping the post-torque rotation check, which is the final confirmation that alignment held through the clamp-down sequence.
🔧 PRO TIP
Before inserting the W950589006100, lightly wipe the spline and pilot tip with a clean rag — never lubricant. Lubricant on the alignment tool migrates onto the clutch disc hub and pilot bore, where it can contaminate friction surfaces or attract debris. The tool's machined fit is precise enough that it doesn't need lube to slide cleanly.
Pre-Installation Inspection: What to Verify Before You Reach for the Tool
The W950589006100 does its job correctly only if the components it references are themselves in spec. Before any alignment work begins, verify the flywheel friction surface is within Detroit Diesel's flatness and surface-finish specifications — a warped or scored flywheel will hold the disc off-axis no matter how well it's aligned at install. Confirm the pilot bearing is the correct part number for the application and that it seats fully and squarely in the crankshaft bore; a bearing that sits proud of the bore by even a fraction of a millimeter changes the alignment reference and produces a misaligned result with a perfectly good tool. Inspect the clutch disc hub for burrs or contamination from shipping, and verify the pressure plate is the correct part number paired to the disc and flywheel. Skipping any of these checks puts you back in eyeball-alignment territory regardless of what tool you use. The W950589006100 is the precision instrument; the surrounding components are the references it depends on.
Why the Torque Sequence Matters as Much as the Final Spec
Final torque value gets all the attention, but on a clutch pressure plate the torque sequence is what determines whether alignment holds. The pressure plate cover is a stamped or cast steel ring with the diaphragm spring built into it; it's stiff but not infinitely so. If you torque one bolt to final spec while its neighbors are still hand-tight, the cover deforms locally — pulling the disc toward the over-torqued side as the spring loads up. By the time you get around to torquing the other bolts, the disc has already shifted off the W950589006100's centerline and is locked there for the life of the install. The correct method is always a star or cross pattern, three to four progressive passes, with each pass adding equal increments of torque around the circumference. The first pass might land at 30% of final spec, the second at 70%, the third at 100%. This sequence keeps the cover loading evenly, keeps the disc centered against the alignment tool, and produces a final torque condition that holds the geometry the tool established. Skipping the multi-pass approach is one of the most common reasons a properly aligned clutch ends up misaligned anyway.
Troubleshooting Common Issues
Symptom: Alignment tool binds in the disc hub.
Most often, the clutch disc is installed backwards. Pull the tool, remove the disc, verify the marked side faces the flywheel, and reinstall. If the disc is correctly oriented, check for burrs on the disc hub or a debris-contaminated spline.
Symptom: Tool slides through the disc but won't seat in the pilot bore.
The pilot bearing is either incorrectly seated, partially installed, or the bore is contaminated. Pull the tool, inspect the pilot bearing depth, clean the bore, and verify the bearing is fully home before retrying.
Symptom: Disc rotates with noticeable runout after pressure plate is torqued.
The disc shifted during torque-down — usually because the bolts were tightened in non-uniform sequence or the pressure plate cocked on its dowels. Loosen the pressure plate, reinsert the W950589006100, and re-torque using a strict star pattern in three progressive passes.
Symptom: Transmission won't slide home even with alignment tool used.
Verify the transmission is square to the engine on the jack and not cocked. Check that the clutch release bearing and fork are properly positioned, that the input shaft splines are clean, and that no hardware or wiring is interfering with seating. A correctly aligned clutch will allow the transmission to slide home with a light push.
Symptom: New clutch chatters or slips after install.
If alignment was correct, suspect contaminated friction surfaces, an improperly resurfaced flywheel, or a pressure plate clamp load issue. Pull the inspection cover, check for oil intrusion at the rear main and input shaft seal, and verify the actuator is calibrated per Detroit Diesel procedure.
Tool Compatibility & Platform Variations
The W950589006100 is dedicated to Detroit Diesel DD13 and DD15 engines paired with the DT12 automated manual transmission. The DT12 is found in Freightliner Cascadia and Western Star Class 8 applications, where it has become the dominant automated manual on Detroit drivetrains. The tool is not interchangeable with Detroit Series 60 manual transmission alignment tools — those use a different spline pattern and pilot diameter — and it is not the correct tool for Allison automatic torque converter installations on the same engines, which do not use a clutch disc at all. If your shop services mixed fleets, the W950589006100 should sit in a labeled storage location next to other Detroit Diesel-specific tooling so the wrong tool isn't grabbed in a rush.
Safety & Shop Best Practices
DT12 transmission R&R is a heavy-vehicle service operation. Always work with the truck on a properly rated lift or stands, support the transmission on a transmission jack rated for the assembly weight, and never position any part of yourself under an unsupported drivetrain. Wear safety glasses any time you're working overhead near the bell housing — debris and old grease frequently rain down during separation. Disconnect the battery before disturbing the DT12 actuator electrical connections, and follow Detroit Diesel's prescribed actuator calibration procedure after the transmission is reinstalled. When storing the W950589006100, hang it or place it in a dedicated drawer slot — leaving it loose in a tool tray invites nicked splines, which directly degrade alignment accuracy on the next install.
Post-Installation: DT12 Actuator Calibration and First-Drive Verification
Aligning the clutch correctly is half of a successful DT12 clutch service; the other half is the actuator calibration that follows transmission installation. The DT12's electronic clutch actuator stores travel and load reference points that allow it to engage smoothly across the operating range. After any clutch replacement, those reference points need to be re-learned to match the new disc and pressure plate combination. Run the calibration procedure specified in the current Detroit Diesel service publication — typically a guided routine through the OEM scan tool that cycles the actuator across its range and records new endpoints. Verify the calibration completes without fault codes. After calibration, conduct a low-speed drive cycle on the lot to confirm clean engagement, smooth shifts, and no abnormal noise from the bell-housing area. Catching an issue at the lot stage is dramatically cheaper than catching it on a road call. The W950589006100's job ends at clean alignment; the actuator calibration and first-drive check seal the work.
Tool Care and Storage Best Practices
The W950589006100 is a precision instrument, and like any precision instrument it deserves the storage discipline that protects its accuracy over the life of the tool. After every use, wipe the spline section and pilot tip with a clean rag to remove any debris picked up during the install. Apply a thin film of light oil to prevent corrosion if the tool will sit unused for an extended period. Store the tool in a dedicated drawer location or wall hook — never loose in a tool tray where the spline tip can be dinged by other hardware. A nick on the pilot tip directly degrades alignment accuracy on the next use, and a damaged spline can transfer that damage to the next clutch disc that the tool is inserted through. Inspect the tool periodically for signs of wear, particularly at the pilot tip and the engagement face of the splines. With proper care, the W950589006100 will service hundreds of clutch installations without losing its reference accuracy.
Frequently Asked Questions
Q: Do I need to recalibrate the DT12 actuator after a clutch replacement?
A: Yes. Detroit Diesel specifies an actuator calibration procedure following any clutch service. The W950589006100 ensures the mechanical alignment is correct so the calibration runs cleanly without throwing fault codes.
Q: Can the W950589006100 be used with the engine in or out of the truck?
A: Both. The procedure is identical whether you're working on the bench during an overhaul or in the chassis during a transmission R&R. Bench work is generally easier because you have unrestricted access.
Q: What torque spec do I use for the pressure plate bolts?
A: Always use the current Detroit Diesel service publication for the specific engine and pressure plate combination. Torque specs vary by pressure plate model and have been updated over time — don't rely on memory.
Q: How do I know if a previous installer used an alignment tool?
A: You generally don't know until you pull the assembly. Telltale signs include uneven wear on the disc facings, scoring on the input shaft splines, and pilot bearing damage out of proportion to the truck's mileage.
Q: Is there an alignment shortcut if I don't have the W950589006100?
A: No. The DT12's tolerances do not forgive eyeball alignment, and generic alignment tools rarely match both the spline pattern and pilot diameter correctly. The right tool is the only reliable answer.
Q: Will the tool work for a clutch replacement on a Detroit Diesel DD16?
A: Verify against current Detroit Diesel application data. The W950589006100 is specified for DD13 and DD15 with DT12 — applications outside that scope require platform-specific verification.
Q: Can I leave the alignment tool in the assembly while torquing?
A: Yes — that's exactly how it's used. The tool stays in place during the entire pressure plate torque sequence and is removed only after final torque is achieved.
Q: How heavy is the tool, and is shipping included?
A: Shipping weight is approximately 7 pounds. Apex Tool Company offers free shipping on orders over $500 to the continental US, so pairing the W950589006100 with other DT12 service tooling can qualify the order for free freight.
Add the W950589006100 to Your DT12 Service Kit
OEM-dimension precision. Shop-floor durability. $275.00 — In stock — Ships fast.
Buy the W950589006100 →Apex Tool Company • 812-579-5478 / 800-365-2233 • Mon–Fri 8 a.m.–5 p.m. ET