
Blog
Detroit 92 Series Rear Crankshaft Wear Ring Installation Steps
Precision rear crankshaft reconditioning guidelines for commercial fleet and marine mechanics.
.png)
Performing a rear main seal service or major engine overhaul on a Detroit Diesel 6V92 or 8V92 engine with a grooved rear crankshaft journal? Follow this step-by-step professional workshop procedure to clean the crank flange, apply retaining compound, and press oversized wear sleeves home cleanly using the M30060 installer.
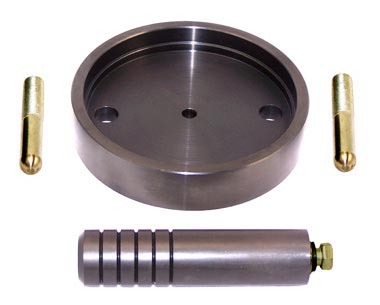
Why Off-Angle Wear Sleeve Driver Striking Destroys Rear Seals
The rear crankshaft seal on Detroit Diesel 92 Series engines must retain oil against high crankcase pressures and rapid rotational speeds. When an original crankshaft journal develops a deep seal groove, installing an oversized repair sleeve is the standard industry procedure. However, these repair sleeves are made of hardened, thin-gauge stainless steel or alloy. If a mechanic attempts to install the wear sleeve using loose blocks, generic driver rings, or unguided hammer strikes, driving force is applied unevenly. The thin sleeve cocks in the entrance chamfer, buckling the cylindrical wall or flaring the outer edge. Once the flywheel housing and new rear main seal are reinstalled, the distorted sleeve acts like a lathe tool—shredding the fresh elastomeric seal lip within minutes of engine startup. Utilizing a bolt-on guided installer like the 10-pound M30060 anchors driving force squarely against the crankshaft flange, forcing the wear sleeve down a 100% parallel axis to set exact OEM depth without buckling the metal.
The 5-Step Rear Wear Sleeve Installation Protocol
- Crankshaft Journal Prep & Triage: Remove the flywheel and old rear main seal assembly. Thoroughly clean old oil glaze, rust scale, and burrs off the rear crankshaft flange journal using fine crocus cloth and solvent. Wipe the journal surface bone-dry.
- Apply Retaining Compound: Apply a light, uniform bead of high-temperature anaerobic retaining compound (e.g., Loctite 609/680) around the grooved area of the crankshaft journal per manufacturer instructions to fill micro-imperfections and prevent oil migration beneath the sleeve.
- Position Oversized Wear Ring & Mount M30060 Tool: Set the fresh oversized repair wear ring squarely over the entrance chamfer of the rear crankshaft journal. Place the inner guide hub of the M30060 installer squarely against the wear sleeve drive face and align its mounting holes with the crankshaft flywheel bolt pattern.
- Execute Controlled Mechanical Pressing: Thread the M30060 mounting bolts loosely into the crankshaft flange. Tighten the central forcing screw or advance the installer plate evenly in a star pattern using hand wrenches. The M30060 driver ring will push the oversized wear sleeve straight and smoothly over the journal until the tool shoulder bottoms out flat against the crank flange face.
- Inspect Sleeve Surface & Cure Time: Remove the M30060 installer tool and visually inspect the installed wear sleeve. Verify 360-degree flat seating, zero wall buckling, and clean lip geometry. Allow the anaerobic retaining compound to cure fully before installing the new rear main oil seal and mounting the flywheel.
PRO-TECH ANAEROBIC SEALANT & HAMMER MANDATE:
Always use the threaded forcing hardware on the M30060 tool to advance the wear sleeve onto the journal smoothly! Never strike the tool body with heavy steel sledges, as violent impact shocks can distort the delicate repair sleeve or damage crankshaft thrust bearings. Always advance the sleeve smoothly using hand wrenches!
10 lbs of Heavy-Wall Tool Steel Precision. Protect Detroit 92 Series Crankshafts.
Get the M30060 Wear Ring Installer Now
overall rating:
my rating:
log in to rate