
Blog
Heavy-Duty Thermostat Seal Service Steps
Precision cooling system maintenance guidelines for commercial diesel mechanics and fleet rebuilders.

Replacing thermostat seals on a Caterpillar, Cummins ISX15, or Detroit Diesel engine during a cooling system overhaul? Follow this step-by-step professional workshop procedure to clean housing counterbores, select the pilot step on the M20102 installer tool, position new press-fit lip seals, and drive seals squarely to positive housing stops without tearing rubber lips or warping outer steel casings.
Why "Improvised" Socket Drivers Destroy Thermostat Housing Counterbores
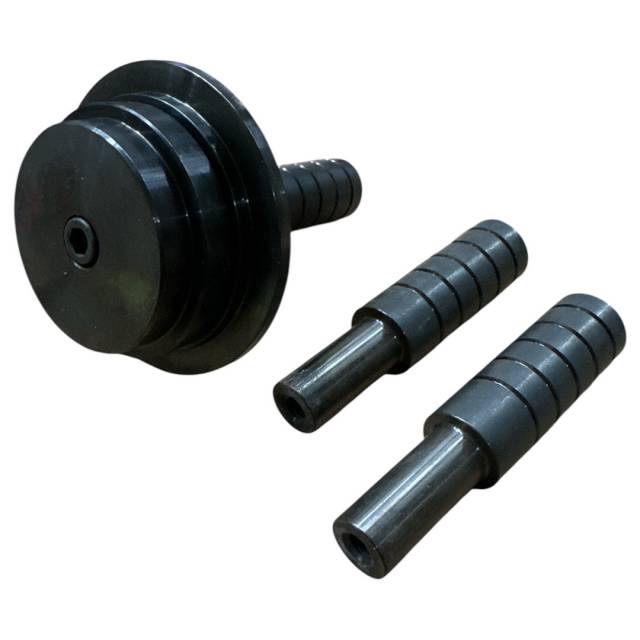
On heavy-duty commercial diesel engines, thermostat seals are interference-fit into cast iron or aluminum water outlet housings. Because the sealing lip seals directly against the moving thermostat shaft or sleeve, maintaining perfectly square positioning inside the housing bore is vital. Technicians who attempt to seat new thermostat seals using standard mechanics' sockets or brass drift punches face major installation defects. Sockets rarely match the exact outer diameter of heavy-duty thermostat seals. As hammer strikes are applied, the socket wall presses on the fragile inner rubber lip instead of the steel casing shoulder, cutting or tearing the seal lip before the engine even starts. Worse yet, drifting one side at a time cocks the seal in the housing, gouging sharp metal burrs into soft aluminum counterbores. Scratched counterbores allow coolant to track around the outside of the seal casing, creating chronic external leaks and low operating temperatures. Utilizing the 2.00-pound M20102 Universal Thermostat Seal Driver eliminates these installation defects completely. Its precision-stepped disc face contacts only the outer steel casing flange, keeping driving force 100% parallel while guiding the seal smoothly to factory depth stops.
The 5-Step Heavy-Duty Thermostat Seal Installation Protocol
- Remove Water Housing & Extract Old Seal: Drain engine coolant and remove the thermostat housing. Extract old thermostat seals using a seal puller, taking care not to scratch internal counterbore walls.
- Clean & Inspect Housing Counterbore: Wire-brush scale and mineral deposits from internal housing bore faces. Wipe clean with solvent and inspect counterbore seat shoulders for burrs or corrosion scoring.
- Position New Seal & Match M20102 Pilot Step: Align the new OEM thermostat seal squarely over the housing counterbore. Match the correct stepped pilot face of the M20102 installer tool onto the outer steel casing shoulder of the seal.
- Drive Seal Squarely to Housing Depth Stops: Hold the M20102 driver handle perfectly vertical. Strike the driver stem cap squarely using a brass or dead-blow hammer until the seal seats firmly against the bottom housing shoulder.
- Inspect Seal Lip & Install Thermostat Assembly: Verify visually that the seal casing is 100% flush and the rubber sealing lip is unmarred and properly oriented. Install fresh thermostats, replace housing gaskets/O-rings, torque housing bolts to OEM spec, and refill coolant.
PRO-TECH BRASS HAMMER & HOUSING CLEANLINESS MANDATE:
ALWAYS USE A BRASS OR DEAD-BLOW HAMMER on the M20102 driver handle! Never use hardened steel sledgehammers that mushroom tool ends! ALWAYS CLEAN COUNTERBORE SEATS THOROUGHLY to ensure press-fit seals bottom out dead-flat without trapping mineral scale!
2.00 lbs Universal Heavy-Duty Diesel Thermostat Seal Driver. Protect Commercial Engines.
Get the M20102 Tool Now
overall rating:
my rating:
log in to rate