
Blog
PACCAR MX13 Piston Installation Steps
Precision engine piston and cylinder liner installation guidelines for commercial diesel mechanics and fleet rebuilders.

Installing piston assemblies into a PACCAR MX13 engine block during an in-frame repair or major overhaul? Follow this step-by-step professional workshop procedure to stagger ring end gaps, lubricate piston skirts, position the ATC 7900 ring compressor, align connecting rod journals, and tap pistons smoothly into cylinder liners without ring breakage.
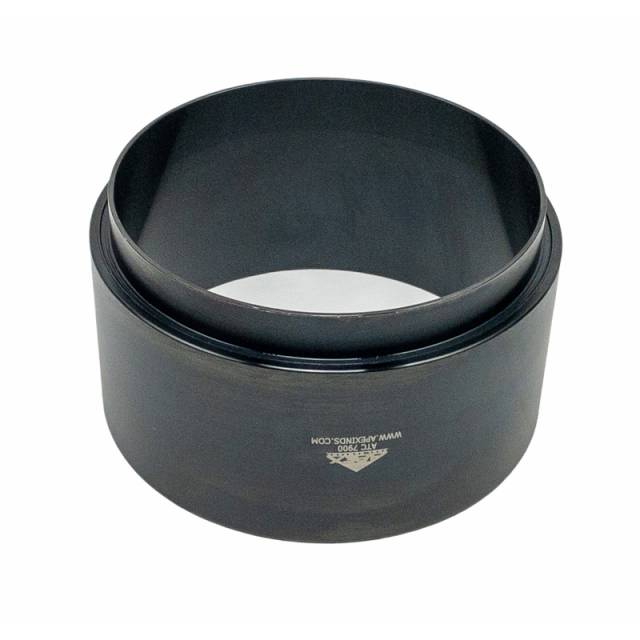
Why Adjustable Band Compressors Ruin PACCAR MX13 Cylinder Liners
On PACCAR MX13 heavy-duty diesel engines, cylinder liners are finished with a precision cross-hatch hone pattern designed to retain oil film for piston ring lubrication. Because the piston rings feature high radial expansion force, installing them requires a tool that maintains absolute concentricity with the liner bore. When technicians use adjustable sheet-metal band tools or universal pliers-type ring compressors, three failure points occur: First, band compressors flex, leaving gaps at the tension seam where oil expander rings pop outward. Second, as the piston is tapped down, the band slips out of alignment with the deck face, allowing the top compression ring to slam directly into the sharp top edge of the liner bore. This impact shears the ring land or fractures the ring. Third, cocked bands drag steel edges down the cylinder wall, gouging deep scratches into the cross-hatch honing. Gouged liners allow combustion gas to blow into the crankcase, causing immediate power loss and excessive oil consumption. Utilizing the 5.00-pound ATC 7900 Tapered Ring Compressor prevents these installation failures entirely. Its solid steel body pilot-seats flush against the liner top, compressing ring packs gradually and guiding the piston straight down with light wooden mallet taps.
The 5-Step PACCAR MX13 Piston & Ring Installation Protocol
- Stagger Piston Ring End Gaps & Lubricate Assembly: Verify ring end gaps per PACCAR specifications. Stagger compression and oil ring gaps 120 degrees apart (never align gaps with wrist pin or thrust faces). Coat piston skirts, ring lands, and cylinder liner walls with clean engine oil.
- Position ATC 7900 Compressor on Liner Deck: Place the ATC 7900 ring compressor squarely over the target cylinder liner. Ensure the bottom pilot flange sits flat and centered against the liner top chamfer.
- Insert Piston Assembly into ATC 7900 Tapered Sleeve: Guide the connecting rod down through the liner bore, ensuring wrist pin orientation matches PACCAR front-of-engine marks. Lower the piston skirt into the top opening of the ATC 7900 sleeve.
- Compress Rings & Tap Piston Smoothly: Hold the ATC 7900 compressor firmly down against the block deck with one hand. Using a wooden or plastic mallet handle, apply light, steady taps to the center of the piston crown to drive the piston down through the tapered sleeve into the liner. *If resistance is felt, STOP immediately and check for caught rings!*
- Verify Free Movement & Guide Rod to Crank Journal: Guide the connecting rod big-end onto the crankshaft journal. Verify smooth piston movement through the bore, install connecting rod cap, and torque rod bolts to OEM factory stretch specifications.
PRO-TECH RING GAP STAGGER & MALLET SAFETY MANDATE:
ALWAYS STAGGER RING END GAPS 120 DEGREES APART before inserting into the ATC 7900 sleeve! Aligned ring gaps WILL cause severe blow-by and compression loss! ALWAYS USE WOODEN OR PLASTIC MALLET HANDLES on piston crowns! Never strike pistons with steel hammers!
5.00 lbs Precision Tapered Piston Ring Compressor. Protect PACCAR Overhauls.
Get the ATC 7900 Compressor Now
overall rating:
my rating:
log in to rate