Blog
CAT 3406 / 3408 / C15 Crankshaft Seal & Wear Sleeve Installation Procedure
The bench-tested install procedure CAT rebuilders actually use.

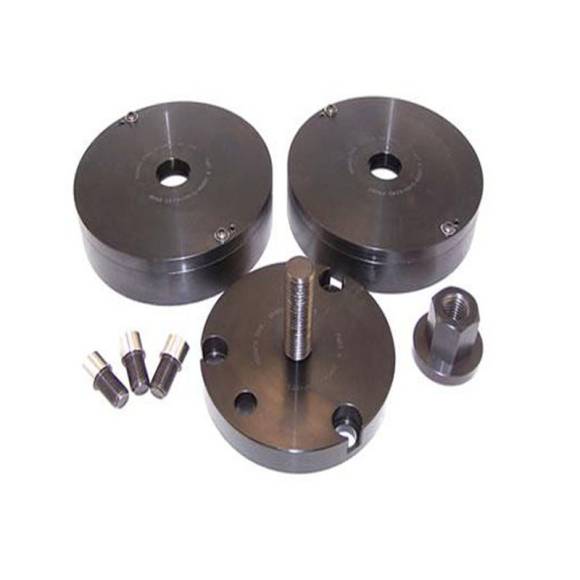
A bench-tested, shop-floor walkthrough of installing front and rear crankshaft seals and wear sleeves on CAT 3406, 3408, and C15 engines — using the M10050 installer the way the procedure is meant to be run.
Why Crankshaft Seal Installation is Non-Negotiable on CAT 3406 / 3408 / C15
The CAT 3406, 3408, and C15 platforms are workhorses — and the workhorses bleed where the crank exits the case. Both the front cover seal and the rear main seal sit in heavily loaded zones: the front fights harmonic vibration from the damper, the rear fights flywheel deflection and clutch-side oil push. Combine that with the typical CAT-spec wear sleeve interface, and you have two locations that punish lazy installation. A seal installed at a slight angle, driven too deep, or pressed onto a grooved journal will leak — sometimes immediately, sometimes 5,000 miles later, but always before the rebuild warranty runs out.
The M10050 exists to remove the variables. It pilots the wear sleeve square to the crank centerline, then drives the seal to the correct depth without contacting the lip. Used correctly, it eliminates the four most common installation defects in one stroke. The procedure below is how to use it on the bench, every time, with no shortcuts.
The Front & Rear Crankshaft Seal Installation Checklist
- Inspect, clean, and stage the journal surface. Before any seal or wear sleeve touches the engine, the crank journal and the bore in the front cover or rear housing must be spotless. Wipe both surfaces with a lint-free shop towel and brake cleaner. Inspect the crank journal for wear grooves, scoring, or pitting — these are the conditions that demand a wear sleeve in the first place. Confirm that the bore in the housing is clean, dry, and free of old sealant residue. Tools needed at this step: scraper, lint-free towels, brake cleaner, inspection light, micrometer if you want to confirm journal diameter against spec. The common mistake here is rushing the cleaning. A single fiber from a paper towel under a seal lip will leak just as reliably as a cocked install.
- Pilot and seat the wear sleeve on the crank journal. If the journal shows a measurable wear groove from the previous seal, the wear sleeve is mandatory. Slide the wear sleeve onto the crank snout (front) or rear hub by hand to confirm it starts square. Then place the M10050 wear sleeve drive component over the sleeve, ensuring the contact face sits flat. Drive the sleeve home with controlled, alternating taps from a dead-blow hammer until the tool bottoms against its stop. The tool's geometry guarantees the sleeve seats concentric to the crank axis — which is the entire reason you bought the installer. Common mistake: starting the sleeve crooked by hand, then trying to "straighten" it with the driver. If the sleeve does not start square, pull it off and restart.
- Lubricate and stage the new crankshaft seal. Lightly lubricate the seal lip with clean engine oil — never grease, never silicone, never assembly lube on the lip itself. The outer diameter of the seal can be coated with a thin film of clean oil to ease press-in, unless the seal manufacturer specifies a dry install (some PTFE seals are dry-install only). Confirm the seal orientation: the spring-loaded lip faces toward the oil, not the air side. Tools needed: clean engine oil, lint-free applicator, manufacturer's seal spec sheet. Common mistake: installing the seal backward, which is a guaranteed comeback within hours of startup.
- Drive the seal to correct depth with the M10050. Place the seal over the wear sleeve, ensuring the outer case starts squarely into the bore by hand pressure alone. Then position the M10050 seal driver against the seal's outer case — never the lip, never the spring. Drive the seal in with controlled blows from a dead-blow hammer, working around the perimeter if the tool is a non-stop-style driver, or simply driving until the stop ring bottoms out on the housing if the tool is depth-controlled. The M10050 is engineered to deliver the correct seal depth for the CAT 3406, 3408, and C15 specifications — no measuring required. Common mistake: driving with a regular ball-peen hammer that introduces side loads and tilts the seal during the last few millimeters of travel.
- Verify, document, and reassemble. Once the seal is fully seated, remove the M10050 driver and visually verify that the seal sits flush in the bore around its entire circumference. Run a finger lightly around the lip — it should be smooth, uninterrupted, and oriented correctly toward the engine interior. Document the install in the rebuild log: seal part number, wear sleeve part number, date, and technician initials. This documentation is what saves your warranty position if a future leak ever turns into a dispute. Reinstall the front cover or rear housing with new gaskets and the correct torque sequence per the CAT service literature for the specific engine variant. Common mistake: skipping the post-install visual check and torquing the housing without confirming seal depth.
🔧 PRO-TIP: The Two-Minute Lip Inspection That Saves Rebuilds
Before you walk away from the bench, take a flashlight and a small inspection mirror and visually confirm the seal lip sits on the wear sleeve at a perfect 90 degrees with no visible roll or pinch. This two-minute check has saved more CAT rebuilds from comebacks than any other single habit on a diesel shop floor. If the lip looks tilted, pull the seal and restart. It is cheaper now than it will be in four hours when the engine is back in the chassis.
Troubleshooting Common Issues
Symptom 1 — Visible oil leak at the rear main within 24 hours of startup. Almost always an inverted seal lip from a cocked install or a missed wear sleeve over a grooved journal. Pull the housing, inspect, and reinstall with the M10050 used correctly from step one. Do not attempt to "wait and see" — a fresh seal that leaks on day one will not seal on day thirty.
Symptom 2 — Slow weep at the front cover after thermal cycling. Usually a seal driven slightly too deep, blocking the return drain in the front cover, or a tilted wear sleeve creating uneven lip contact. Verify wear sleeve concentricity and seal depth against the M10050's controlled-depth stop.
Symptom 3 — Oil contamination on a fresh clutch. Classic rear main seal failure, often from an installation done without a proper installer. The clutch needs to be cleaned or replaced and the seal redone. This is the single most expensive comeback on a CAT rebuild — and the most preventable.
Symptom 4 — Squeal or rumble from the front of the engine after seal R&R. Usually the seal lip running dry on the wear sleeve because the installer skipped lip lubrication or because the wear sleeve was contaminated with grease or assembly lube. Clean and re-lubricate per the seal manufacturer's spec.
Symptom 5 — Wear sleeve walked loose on first run. Indicates the sleeve was installed without being driven to its mechanical stop, or was installed onto a journal that was below the minimum spec diameter. Always verify journal diameter before sleeve install — if the journal is undersized, the sleeve will not provide an interference fit, and the seal will fail.
Tool Compatibility & Engine Variations
The M10050 is engineered specifically for the CAT 3406, 3408, and C15 crankshaft seal and wear sleeve geometry. The 3406 family spans the 3406A, 3406B, 3406C, and 3406E variants — all share the same crank seal interface for purposes of this installer. The 3408 V8 platform shares the same front and rear seal architecture in its industrial, marine, and on-highway configurations. The C15 covers the pre-ACERT and ACERT iterations, which retain the same seal and wear sleeve fitment despite changes elsewhere in the block. The installer consolidates the functions of legacy CAT tool numbers 6V-6142, 6V-6143, 5P-1733, 5P-1737, and 9S-8858, meaning a single purchase replaces what used to require five separate part numbers in the tool crib.
For shops working across the 3406 / 3408 / C15 service spectrum — whether in-frame, out-of-frame, reman, or fleet maintenance — the M10050 is the single installer that covers every front and rear crank seal job on these platforms. Confirm your specific engine serial range against the application listing before ordering for any uncommon variant, but for the standard production runs, this tool is a direct fit.
Safety & Shop Best Practices
Safety on a crank seal install is not dramatic — there are no pinch hazards rivaling a press or a torque-multiplier — but the discipline matters. Wear safety glasses any time you are striking a tool with a hammer; metal shrapnel from a misfired blow is the most common shop-floor injury on this type of job. Keep the work area free of solvent fumes if you are still using parts-cleaning chemicals near the bench. Use a dead-blow hammer, never a ball-peen — the rebound risk and the chance of marking the installer face are both real reasons to retire the ball-peen for this procedure.
Beyond personal safety, the discipline is about cleanliness and documentation. A clean bench produces clean installs. A clean install produces a dry engine. A dry engine produces a happy customer and a profitable shop. Document every seal and wear sleeve part number against the engine serial, store the M10050 in its dedicated location after every use, and confirm the installer's contact surfaces are clean before the next job. Tools that live in the bottom of a parts cage degrade — tools that live in a marked location stay precise.
Tool Care, Storage & Calibration Discipline
A precision installer is only as accurate as its last cleaning. The M10050 sees its contact surfaces meet seal cases, wear sleeves, and hammered drive faces every time it is used — and every cycle leaves the possibility of microscopic burrs, embedded grit, or dried oil residue that, over time, will degrade the tool's geometry. The discipline of caring for the installer is what separates shops that use the M10050 for a decade from shops that wear theirs out in eighteen months. Treat the tool the way you treat your micrometers and your torque wrenches — because functionally, it belongs in the same category of precision shop equipment.
The post-job protocol is simple but non-negotiable. Wipe every contact face with a clean lint-free shop towel immediately after use, while the surfaces are still warm from the work. Inspect the drive face under good light for nicks, raised metal, or embedded debris — any of these will telegraph into the next seal install as a cocked seat or a marked seal case. If you find a raised burr, dress it gently with a fine stone, never with a coarse file. Apply a thin film of light machine oil to all polished surfaces to prevent corrosion, especially in humid shop environments. Return the installer to its dedicated storage location, not the bottom of a parts drawer where it will collide with other tools and lose its precision over time.
Pre-job verification takes thirty seconds and is worth far more. Before you stage the M10050 against a fresh seal and a clean crank journal, inspect the tool's pilot diameter, drive face, and depth stop for any sign of accumulated grit. Wipe again if needed. Confirm the tool moves smoothly into its mating geometry — any binding indicates contamination that must be addressed before the job continues. This is not paranoia; it is the same discipline a machinist applies to a dial indicator or a torque wrench. Precision tools deliver precision results only when they are treated as precision tools, and the M10050 will reward that treatment with a decade of leak-free CAT rebuilds.
Documenting the Install for Long-Term Shop Accountability
The final discipline that turns a good install into a great one is documentation. Every CAT rebuild that crosses your bench should leave a paper trail — or, in modern shops, a digital trail — that captures exactly which seal and wear sleeve part numbers were installed, on which engine serial number, by which technician, on what date. This is not bureaucracy. It is the only evidence you will have if a warranty question arises six months later when a customer claims the engine has always leaked.
Standardize a single line item in your rebuild log: "Crankshaft seal R&R — front P/N: ___ — rear P/N: ___ — wear sleeves installed front/rear: Y/N — installer used: M10050 — technician initials: ___ — install date: ___." That single line, captured on every CAT 3406, 3408, and C15 rebuild that leaves your floor, is the document that ends warranty disputes before they start. It also creates a feedback loop inside the shop: if a particular seal part number shows up in a future return, the log identifies it. If a particular technician's installs never come back, the log identifies that, too — and that information is worth more than any single repair charge.
Technician FAQ Section
Q: Do I need to remove the crankshaft to install the rear seal?
No. The rear seal installs with the crank in place, after the flywheel and rear housing are removed. The M10050 is designed for this configuration.
Q: Can I reuse a wear sleeve from a previous install?
Never. Wear sleeves are single-use. Once installed and run, the sealing track is permanently set. A reused sleeve is a guaranteed leak.
Q: What if the crank journal still measures within spec — do I still need a wear sleeve?
If the journal is within spec and shows no visible groove or pitting at the previous seal contact location, a wear sleeve is optional. If you see any groove, install the sleeve.
Q: Which way does the seal lip face?
Spring-loaded lip toward the oil — that is, toward the engine interior. The flat side of the seal case faces outward.
Q: What lubricant should I use on the seal lip?
Clean engine oil, applied lightly with a lint-free applicator. Avoid grease and silicone-based lubricants unless the seal manufacturer specifically calls for them.
Q: Can the M10050 be used on engines other than the listed CAT models?
The tool is engineered for the CAT 3406 / 3408 / C15 seal geometry. Use on other engines is not recommended unless the seal and journal dimensions are verified to match.
Q: How do I store the M10050 between jobs?
Wipe contact surfaces clean, apply a light film of oil to prevent corrosion, and store in a dedicated tool location. Treat it the way you would treat a precision measuring tool.
Q: What is the warranty on the M10050?
Apex Tool Company stands behind the M10050 for defects in materials and workmanship. Contact 812-579-5478 with any warranty questions.
Run the Procedure the Right Way — Every Time.
M10050 Front & Rear Crankshaft Seal & Wear Sleeve Installer — $586.80 | In Stock | Free U.S. shipping over $500
ORDER THE M10050Call 812-579-5478 or 800-365-2233 | Mon–Fri 8 a.m.–5 p.m. ET
overall rating:
my rating:
log in to rate