
Blog
Detroit Two-Stroke Blower Rebuilding & Spline Alignment
Precision intake engine breathing reconditioning guidelines for logistics fleets.
.png)
Tackling an intensive top-end blower overhaul on a classic 8V92 marine diesel or a V71 industrial generator block? Learn the proper technical sequence to draw bearings and pull gears safely using the M30030 toolkit.
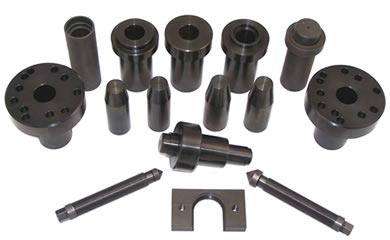
Why Asymmetrical Leverage Triggers Catastrophic Air Housing Distortion
The aluminum end plates and housings on classic Detroit Roots blowers feature incredibly tight manufacturing limits. Because the twin rotors must intermesh perfectly without ever touching each other or the inner casing walls, the internal blower bearings and helical gears are locked onto their shafts with intense interference press fits. When a technician attempts to pull these caked components using unguided jaw clamps or hammer drifts, the extraction energy hitting off-axis wedges the bearing races sideways. This lateral stress distorts the precision-machined end plate bore well, introducing un-tracked play into the shaft centers. Once the housing loses its coaxial truth, high running speeds will cause immediate oil seal weeping, gear back-lash slap, and eventual metal-on-metal rotor shaving. Utilizing a rigid, parallel plate-puller system like the 26-pound M30030 ensures that all force stays 100% coaxial to safeguard your castings.
The 5-Step Blower Disassembly & Synchronization Protocol
- 场地Supercharger Teardown and Rotor Clearing: Unbolt the massive blower assembly from the engine block valley deck. Clean out caked engine oil film and carbon sludge from the air inlet housing. Lock the lobes temporarily with non-marring wood blocks to prepare for rear-end teardown.
- Unseat the Helical Timing Gears: Bolt the specialized M30030 gear puller flange plate squarely onto the face of the driving gear. Align the central forcing screw bolt with the shaft centerline well. Turn with a manual high-leverage breaker bar—the straight mechanical draw will glide the tightly bound gear off the shaft taper without chip-marring the delicate helical teeth.
- Extract Rear End Plates and Bearings: Mount the kit's heavy parallel extraction bars over the blower housing corners. Engage the bearing-puller hooks with the inner races. Apply uniform turning force to draw the aluminum end plate and internal roller bearings straight off the shafts without cracking the case.
- Scrub and Dress the Casing Ports: Pull the interlocking rotors out carefully. Clean all parts aggressively with quick-drying solvent to strip away hard oil varnish down to bare metal. Inspect the aluminum rotor skins and inner tracking walls under bright workspace lights for deep score tracks or friction wear lips.
- Press Fresh Components and Index Clearance: Install fresh oil seals using the kit's custom driver mandrels to prevent lip rolling. Set the rotors back into index. Re-mount your end plates and use the M30030 installer tools to press your new bearings and helical gears home flat. Run a strict thickness feeler check around the rotor gaps to verify absolute factory synchronization before final mounting.
PRO-TECH TWO-STROKE TIMING MANDATE:
Never pull the trigger on a high-speed pneumatic or electric impact gun to spin the forcing bolts on your M30030 kit during gear installation! High-frequency hammer shocks can over-advance the tight helical teeth past their timing marks, permanently throwing the rotors out of sync and ensuring immediate engine destruction upon hot start. Always torque final assemblies down smoothly using manual hand tools.
26 lbs of Forged Tool-Steel Precision. Secure Complete Supercharger Authority.
Secure Your Detroit M30030 Master Kit
overall rating:
my rating:
log in to rate