Blog
Pry bars and how to use them

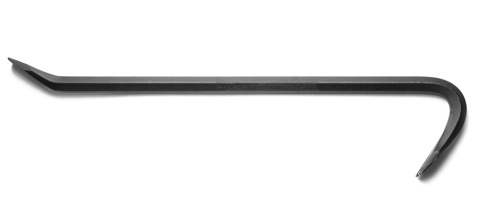
Pry bars have many names. They are known as prybars, crowbars, pinch bars, wrecking bars, prise bars, jimmies, jimmy bars, jemmies, goosenecks or even pikipikis. A pry bar is a tool comprising a metal bar with both ends flattened and a curve on one end. Often, one or both ends will have a small fissure for removing nails. Burglars mostly use the term jemmy or jimmy to refer to a pry bar when they use it for burglary.
Pry bars are normally made of medium-carbon steel. They may also be made of titanium, especially when a lighter or non-magnetic type is required. Commonly, pry bars are forged from cylindrical or hexagonal stock, although more expensive designs may be forged from a shaft of I-shaped cross-section. For example, the specification of a pry bar code named TE8717 from T & E Tools says – 18-inches long, 2.75-lbs., 1/2-in. hexagonal stock, tip width 3/4-in. from both ends; Forged from chrome alloy and heat treated to prevent bending or breaking; Combines roll head and angle head pry bar ends for better access in awkward work areas.
People commonly use pry bars as a lever either to remove nails or to force apart two objects. A typical example is opening nailed wooden crates. You can use pry bars as any one of the three lever classes. However, the curved end is typically used as a first class-lever, while the straight end is more commonly used as a second-class lever.
Using a Pry Bar to Separate Two Objects
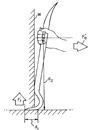
Insert the flat end of the curved side of a pry bar in between the two objects you want to separate. Hold the free end and pull outwards such that the curved end acts as the fulcrum against one of the objects. In case you do not get enough leverage, insert a block of wood under the curved end. The two objects should start to come apart.
Using a Pry Bar to Extract a Nail from a Wooden Plank
Place the flat end of the straight side of the pry bar so its fissure is on either side of the head of the nail. You may have to hammer the pry bar lightly to enable it to bite into the wood and get under the nail head. Gently press downwards on the free end until the nail head lifts up. Drive the fissure in so that it grips the nail head more firmly and press downwards to extract more of the nail. As the nail comes out, you may need to insert a wooden block under the pry bar to retain the leverage. Alternately, you may now use the curved end to extract the nail completely.
Other Uses of a Pry Bar
You can use pry bars for countless other activities. Some of them are:
• Removing nails from wood or wall
• Separating two layers of wall
• Removing baseboards and other trims
• Removing moldings
• Removing tiles
• Removing wood slats
• Prying out studs
• Removing metal tracks
• Loosening rusty screws
• Removing carpet tack strips
• Prying up carpet pad staples
• Scraping off old carpet adhesives
Overall, a pry bar is a very handy and inexpensive tool to have both in the workshop and in the home.
overall rating:
my rating:
log in to rate